Quantcast
Channel: Planet Eclipse
Viewing all 6595 articles
Browse latest View live

Benjamin Cabe: Using MQTT and Eclipse Paho in Android Things

$
0
0

A couple of days ago, Google announced that they were essentially rebranding Brillo to Android Things (I do love that name, by the way!), and finally opening it for a Developer Preview.

There are a few things I already like very much in Android Things:

  • It is already supported on Intel EdisonNXP Pico and Raspberry Pi 3, and there are ready to use filesystem images that you can just flash to get going with Android Things in just minutes.
  • The Rainbow HAT sensor kit that’s available for Raspberry Pi is very cool, and includes a 4-digit LED display, 7 RGB LEDs, a temperature and barometric sensor, a piezzo buzzer for basic PWM-based audio, and three capacitive touch buttons. Sparkfun has a kit that’s targeting the Edison, while Adafruit’s kit is general purpose and meant for breadboard enthusiasts.
Rainbow HAT for Raspberry Pi (Photo credit: Pimoroni)
  • Anyone who’s tried to manipulate low-level peripherals using Java will be pretty happy to see that Android Things’ Peripheral I/O APIs provide nice wrappers for GPIOsPWMI2CSPI and UART.
  • Implementing IoT sensor drivers taps into the existing sensor framework you may already be familiar with if you’ve already tried to access the gyroscope or light sensor of an Android device in your app, and the same SensorManager API you’re already used to can be used with your new devices (for which a driver may already exist, and if not adding a new one does not seem overly complex)
  • Finding good development tools for building IoT solutions is always a challenge. It’s great to be able to leverage the Android SDK tools and Android Studio for things like device emulation, debugging, etc.

I just received my Rainbow HAT today and thought I would use the opportunity to do a quick tutorial on how to use MQTT with Android Things, using Eclipse Paho. What’s more, I’ll also show you a cool feature in mqtt-spy that will allow us to easily display the live temperature on a chart.

I used the Weather Station example from Android Things as a starting point, as it is already including code to publish data to the cloud using Google Pub/Sub. My fork is available on Github, and as you can see the changes to the original example are very limited!

Check out the video, and let me know if you have any questions!


PapyrusUML: My past and future -An interview

$
0
0

If you are not aware of the Modeling Languages blog, you are missing one of the best sources of up-to-date modelling information on the web!  And I’m not just saying that because of the recent great interview about me!

Modeling Languages’s Jordi Cabot provides us all with a great interview of Francis Bordeleau, chairman of my Industry Consortium and Ericsson employee, about my past, growth, and future.

In this post, Jordi stated:

I believe this interview is interesting not only for people using Papyrus (or looking for a Eclipse-based modeling tool to use) but it includes many valuable insights for all of you trying to push various open source initiatives and aim for their sustainable development.

And I can’t agree more!

The discussion covers a lot, from Ericsson’s belief that they need to control their tool destiny and that the best way to do this is to be part of it (hint: Open source ME!), to my evolution and the creation of the Me Industry Consortium, enabling many companies to work together to make me better and providing me with more minions!

Thanks to Gordi and Francis for this exposé!


Filed under: Papyrus, Papyrus IC, Uncategorized Tagged: #papyrusic, ericsson, interview, open-source, Papyrus

Ian Skerrett: IoT Trends to Watch in 2017

$
0
0

2016 has been an incredible year for the IoT industry and the pace of innovation looks like it will accelerate in 2017. Last week I participated in a webinar, organized by Canonical, on the IoT trends to watch in 2017. It was a really good discussion, so feel free to listen to the recording.  I think it would also be interesting to summarize some of the 2017 trends I see in the IoT industry and specifically in the Eclipse IoT community.

  1. Industry Consolidation

By some counts there are 300 IoT software platforms available in the market today. This is obviously not sustainable and I see this number dropping significantly in 2017. It appears the VC community is slowing down their investments in IoT startups and expect to see some of the more successful startups being acquired by larger companies looking to complete their IoT technology platform.

In the long term the number of IoT software platforms is going to consolidate to 5-7 suppliers. It will take a number of years but this is the direction the industry will take. If history repeats itself, an open source platform will be one that survives and I expect it will be from Eclipse IoT.

2. Importance of Vertical Industries for IoT

In 2017 we will see more and more focus on vertical industries, like Industrie 4.0, Smart Cities and Connect Car. This is because IoT technology vendors need to show business value and industry solutions are how organization see the real benefit of IoT.

We will see the focus on vertical industries in different areas, including 1) vendors go-to-market strategies that offer industry specific analytics, 2) vertical industry consortium focusing more on IoT technologies, like Industrie 4.0 in Germany, and 3) vertical industry open source technology, like Eclipse 4DIAC and Eclipse Milo. I also expect to see additional open source frameworks that will target specific industries.

3. Follow the Money: IoT Analytics

IoT Analytics will be very important in 2017. All the data that is being collected needs to be transformed into useful information. Expect to see analytics at the edge and via IoT cloud platforms. In 2017, we will see communities of IoT analytic algorithms emerge.

In the Eclipse IoT community, I hope we see analytics technology being incorporated into Eclipse Kura and Eclipse Kapua and new Eclipse projects that focus on IoT analytics.

4. Investments in Fog/Edge Computing

More and more technology is going to be released around Fog/Edge computing. The recent Amazon Greengrass announcement is a good example. It will be interesting to see the work of the OpenFog Computing Consortium being rolled out in 2017. The Eclipse ioFog project has lots of promise and I expect big things from it in 2017.

In 2017, Fog/Edge computing will become the buzz word for the IoT platform vendors. NOTE: of course the definition and terminology of fog or edge is still not well defined.

5. Launch of IoT Markets

As IoT Platforms emerge expect to see IoT markets or marketplaces emerge around them. For instance, Litmus Automation recently announced a marketplace for their platform. In the Eclipse IoT community, we plan to launch in 2017 an IoT Market that will support the Eclipse Kura and Eclipse Smarthome ecosystems of drivers and applications.

Overall, 2017 is shaping up to be an exciting year for the Eclipse IoT community. Eclipse IoT is well positioned to be the leader in open source IoT. I expect to see continued growth in adoption of Eclipse IoT technology and technical innovation within the open source projects.


Kaloyan Raev: Making the Text Editor to be the Default One for All Unknown Files in Eclipse

$
0
0
NOTE. The functionality of the Default Text Editor plugin has been implemented in the Eclipse Platform with the Neon release. Check the release notes for details.

Eclipse users usually work with many different file types. Some of the file types may be opened by default in an external editor instead of in the Eclipse workbench. This happens if Eclipse has no editor available to handle that particular file type, but there is one installed in the operating system. In such case Eclipse assumes that it is better for the user to have the file opened in the external system editor.

Lots of users are quite annoyed by this behavior, especially when it comes to text-based files. They would prefer to have the file opened in the plain text editor of Eclipse instead of switching the context to the external program. Unfortunately, there is no easy way to change this in the preference settings. It's possible to associate a specific file extension with the plain text editor, but this must be done separately for every file extensions. There is no way to say "all text files of unknown type should open in the text editor".

Here comes the Default Text Editor plugin. It takes advantage of the Editor Association Override extension point introduced in Eclipse 3.8. When the plugin is installed it will change the default behavior of Eclipse and will opened all text files of unknown type in the plain text editor. Binary files like images may still be opened in an external system editor. As simple as that.

The plugin is available on the Eclipse Marketplace. It can also be installed through an update site. More info is available on the GitHub project.

Cedric Brun: Graphical Modeling from 2016 to 2017: Better, Faster, Stronger

$
0
0

At Obeo, we believe that modeling is the right way to help IT and industry engineers collaborate efficiently on the design of their smart products. Our innovative approach consists of building specific modeling tools that completely suit users’ business domains. Modeling is a means to an end: by using modeling technologies we make sure that such a tool can be defined faster, as well as deployed and maintained better.

To achieve this goal, we develop highly customizable open source software, such as Eclipse Sirius. We consider that a modeling tool must be adaptable, flexible, and user-friendly. This year again, we worked hard to focus on that!

As you may know, Sirius is the easiest way to get your own modeling tool and to do it rapidly. Indeed, it dramatically reduces the time spent on creating domain-specific modeling workbenches thanks to an interpretation mode that allows very short feedback-loops. In 2016, we invested time in the Eclipse Ecore Tools project to facilitate the definition of modeling languages by providing a very intuitive and powerful Ecore graphical editor.

It’s been three years since Sirius was made open source and the community is growing every year. A few weeks ago, part of this community gathered for the second edition of SiriusCon in Paris. More than 100 attendees coming from more than 10 different countries participated in this international conference on graphical modeling. If that is not proof that Sirius is a worldwide technology, we don’t know what is!

At SiriusCon, we had the opportunity to present one of the latest key features of Sirius: the properties view. It turned out that with all the improvements Sirius brings to the specification of the modeling view, the bottleneck was in the definition of the properties view to be linked to each graphical element. The Obeo team addressed that problem.

Now, Sirius provides an integrated way to define properties views in the same way the user is used to defining them in other parts of the designer: no need for coding - it is dynamic and query based. In addition, with Sirius 4.1, the user is now able to specify exactly how the properties view should be represented.

Sirius 4.1 has default rules based on the type of the elements defined in the metamodel. For example, if the user has defined a string attribute in his metamodel, it will be automatically represented by a text widget; a boolean will be represented by a checkbox, and so on. If the default properties view does not fit the user’s needs, no problem: it can be customized.

In 2017, we want to go further building on the same fundamentals. We will focus on technologies that are real-world ready, adaptable, and give instant feedback.

We’ve been working on the codebase for months already, but next year will see a nice scalability offspring: a core runtime that can scale any number of diagrams or their size while keeping everything consistent like it currently does today. And that’s only under the hood, in a more visible way we’ll hunt for every break a user might encounter in the workflow of using a modeling tool. Here is an example when the user ends up trying to set up diagrams and models while not being the modeling perspective:

The model content or diagrams are not visible in the package explorer yet, the Eclipse IDE doesn’t have an editor for .aird files, and double clicking it will not help. We plan to address this next year by providing a default editor for .aird files.

This editor gives us a whole new dimension to present your tooling features and is the starting point to a project that will grow during the next few years: making the tooling aware of the process to achieve better usability.

Hear me well, the word “aware” is picked with care and “process driven” is banned in this context. In the end the user gets to decide and the tool should never get in the way, but by making the tool aware of the process or methodology we can make it more helpful. This will first be translated by the integration of the Activity Explorer which got contributed to Amalgam by Thales last year. This allows anyone to define the process activities without writing a single line of code, in the very same way you can currently define diagrams, tables or the properties view, right into the .odesign file.

Other improvements especially focused on the diagrams are in the works. Here is a mockup of a new mechanism to enrich existing diagram editors, you can think of it as “decorators on steroids”. Follow this bug if you are interested.

We are in a continuous evolution. We strive to continually improve the user experience and to streamline the complete model environment building process. This means that we have our hands in many Eclipse projects, from Ecore Tools, EMF Compare, Acceleo, Amalgam, EEF to Sirius and improve each of those. We are building various technologies independently while making sure they integrate seamlessly in the final product.

Capella, one of the solutions provided by Eclipse PolarSys Working Group, is one example of a product aggregating such technologies. It is already a field-proven Model-Based Systems Engineering (MBSE) workbench.

Capella was developed by Thales to help engineers formalize system specifications and master their architectural design. It is sustainable and adaptable and has already been successfully deployed in a wide variety of industrial contexts (aerospace, communication, transportation, etc.). This is a modeling environment focused on a domain tooling a methodology, based on many of the technologies mentioned before. It is 100% open source. Check out what can be done with it!

Is modeling in 2017 going better, faster, stronger? Challenge accepted! The Obeo team is up to the task! We will do our possible to reach a new level and deliver cutting edge modeling tools.

To achieve anything we need the support of our enthusiastic community. We know that in 2017 we will be able to rely on the Eclipse users as we have always done. We want to get closer to the users and receive fine-grained feedback to improve our technologies even more. We are currently working on a new online (and IRL!) way to deal with that… but you will have to stay tuned to get more information. Keep your eyes peeled for the upcoming SiriusCon, it’s the best place to interact with us!

Graphical Modeling from 2016 to 2017: Better, Faster, Stronger was originally published by Cédric Brun at CTO @ Obeo on December 20, 2016.

Eclipse Announcements: Eclipse Converge | Program Announced

$
0
0
Program Announced for Eclipse Converge 2017! Early-bird registration is open. Get $120 off the conference pass.

typefox.io: Getting Closer to Xtext 2.11: Beta 2

$
0
0

A second milestone towards Xtext 2.11 named Beta 2 has been published today! The feature set is largely at the same state as with the Beta 1 published on October 21st. The main difference is that we spent a lot of effort in the build system for the new repository structure, allowing us to publish both for Eclipse and for Maven in a clean and consistent way. This means that you can use this new milestone also with Gradle or Maven projects, e.g. in applications built on the Xtext web integration.

We would like to encourage all Xtext users to check this milestone version with their applications and to give us feedback. Now there’s still time to improve things before 2.11.0 is released (January 24th).

Using the Cutting Edge

As usual you can find nightly built snapshots on the Xtext Latest update site or on Sonatype Snapshots. However, if you want to apply even more up-to-date versions to your application, all subprojects of Xtext now offer their build artifacts in local repositories on our build server:

These builds are triggered automatically when changes are pushed to the corresponding GitHub repositories. Please note that while the nightly built snapshots have signed JARs, the cutting edge builds are not signed.

Eclipse Announcements: Eclipse Newsletter | Ready, Set… 2017!

$
0
0
2017. It's already here. Here are six great articles about some of the things you can expect to see in the new year!

PapyrusUML: SE Trends looks at Papyrus-IM!

$
0
0

Earlier this month, The Systems Engineering Trends blog featured an article from my friend Michael Jastram about one of my variants: Papyrus for Information Modeling (or Papyrus-IM for short). You might remember Michael from earlier this year (see here)

For those who do not know, Papyrus-IM is:

A Papyrus-based modeling product that is customized and streamlined for users interested in modeling the static structure of information with UML class diagrams.

In short, a customised version mo Me for a specific purpose, with associated simplification.

From my reading of the article (and my German is not that great…) it seems I am making progress! But don’t take my word for it: go read the article (in German, and Google Translate’s English version), I’ll wait for you back here…

Good! You’re back! Did you enjoy the video? I though it was clear and simple, just like Papyrus-IM!

So what do you think? Am I getting better? I know I feel better!

Papyrus for Real Time is another example of a DSML being implemented using Me. The same approach used for the creation of Papyrus-IM is used for Papyrus-RT for menu reduction and viewpoints, but to a much larger extent as the UML-RT modeling language is much richer than just class diagrams. As stated in a previous blog entry, Papyrus-RT is also available for download, but if you do not know UML-RT, better ask for help from my minions!

Thank you, Michael! I look forward to further articles about Me!

Want to know more about Papyrus for Information Modeling? Check our the following links:


Filed under: UML, Uncategorized Tagged: article, Papyrus-IM, papyrus-rt, review, SE-Trends

Jeremie Bresson: Oxygen M4: convert to AsciiDoc with Mylyn WikiText

$
0
0

If you need to convert your documentation to the AsciiDoc format, you might be interested in this new feature delivered with Eclipse Oxygen M4 (see also my previous blog post: Asciidoctor instead of MediaWiki?). Any file format supported by Mylyn WikiText (textile, mediawiki, markdown and more) can now be converted to the AsciiDoc format. Just select WikiText ▸ Generate AsciiDoc from the context menu in the package explorer.

Convert to AsciiDoc in Eclipse IDE

A new file is generated near to the original file (example.asciidoc in this example). Of course you can preview it with your favorite asciidoctor viewer (Chrome with the Asciidoctor.js Live Preview extension in my case).

AsciiDoc file preview in Chrome

While I was trying to convert some pages of Eclipsepedia to Asciidoctor, I have noticed that some additional concepts need to be supported by the converter. I have opened Bug 508262 to track them. Feel free to leave feedback there if something is not working for you.

You can get the Oxygen M4 version of Eclipse IDE from the Developer Builds download page.

Maximilian and Jonas: JSON Forms – Make-It-Happen Blog Series – Pilot

$
0
0

JSON Forms is a framework to efficiently build form-based web UIs. These UIs are targeted at entering, modifying and viewing data and are usually embedded within an application. JSONForms eliminates the need to write HTML templates and Javascript for manual databinding to create customizable forms by leveraging the capabilities of JSON and JSON schema as well as by providing a simple and declarative way of describing forms. Forms are then rendered within a UI framework – currently based on AngularJS. If you would like to know more about JSON Forms the JSON Forms homepage is a good starting point.

In this blog series, we would like to introduce the framework based on a real-world example application called “Make It happen”. Step by Step, we will add new features to that example application and demonstrate, how JSON Forms eases the development for you. For a better overview, the development steps are organized in days, although we do not expect that it takes anywhere near a full work day to complete the individual steps :-). This series will provide an overview of all features and explain how they work. For a step-by-step and hands-on tutorial how to implement the described features, please see here.

If you would like to follow this blog series please follow us on twitter. We will announce every new blog post on JSON Forms there.

Before we get started, let us explain the big picture on “Day 0”

Day 0 – Basic Requirements

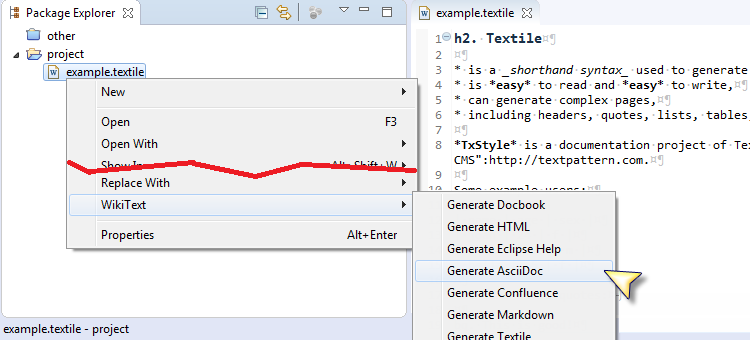
The example application we want to implement is a simple task tracker called “Make it Happen”. We have chosen this example as it is easy to understand, simple, but still provides the opportunity to show the core features of JSON Forms. Therefore, we will try to focus the requirements of the example application on demonstration purposes rather than real world concerns. In our example application, we want to be able to create, view, and modify one entity: tasks. Tasks have attributes such as a name, description, due date, and so on. The UI we would like to create contains a general view of all tasks, as well as a detailed view showing the details of one task. We will leave aside cross-cutting concerns such as authentication and authorization. Let us envision a basic UI capable of fulfilling these requirements. The UI shall show a list of all tasks, once you select a task, it should display the details on the right side (as shown in the following mock).

final_mockup

But enough about requirements for now, we will detail them iteratively while we demonstrate the implementation of the respective UI. So let us start the development with day 1 and create some simple forms.

Day 1 – A Simple Form

This article describes how to define simple forms with JSON Forms including explanatory examples. For a quick start with three steps only, please see here.

We will start to implement the described UI bottom-up. The first elements will be the detail view, for showing the details of an individual task. These views will display controls for all attributes of the entity (a task). Based on the specific attributes, corresponding controls should be used, e.g. a text field for a String attribute, a drop-down box for a Enum, or a date picker for selecting a date. To keep it simple, we will just add three basic attributes in the first iteration as shown in the following mock-up. We will enhance the forms in a later iteration, demonstrating how JSON Forms performs on an evolution of the data schema. In the first iteration, we will add the attributes:

  • “Name” (String) – mandatory
  • “Description” (String)
  • “Done” (Boolean).

The “Name” attribute is a mandatory one, so there should be a validation message, if the user fails to enter something here.

image09

Even for such a simple form, all three controls would have to be manually developed and data-bound. This includes additional features, such as input validation. JSON Forms directly utilizes a data schema based on the JSON schema standard. Therefore, we must only describe which attributes a task consists of. Defining a data schema is very useful even when one is not using JSON Forms, for example, it can be used to validate the data.

The following data schema (a.k.a. JSON Schema) defines the task entity:

{
  "type": "object",
  "properties": {
    "name": {
      "type": "string"
    },
    "description": {
      "type": "string"
    },
    "done": {
      "type": "boolean"
    }
  },
  required: [“name”]
}

With the listed schemata as an input, JSON Forms can already render a fully functional form-based UI, including data binding and validation. The only thing, we need to embed into our website is the following HTML tag:

 <jsonforms schema="taskSchema" data="taskData"></jsonforms>

The two properties “schema” and “data” point to JavaScript variables, which need to be defined in the scope of the directive. The variable “schema” points to the data schema as mentioned above, the variable “data” points to a JSON object, following this data schema. This object will be bound to the UI and therefore, is updated once you start editing the form.

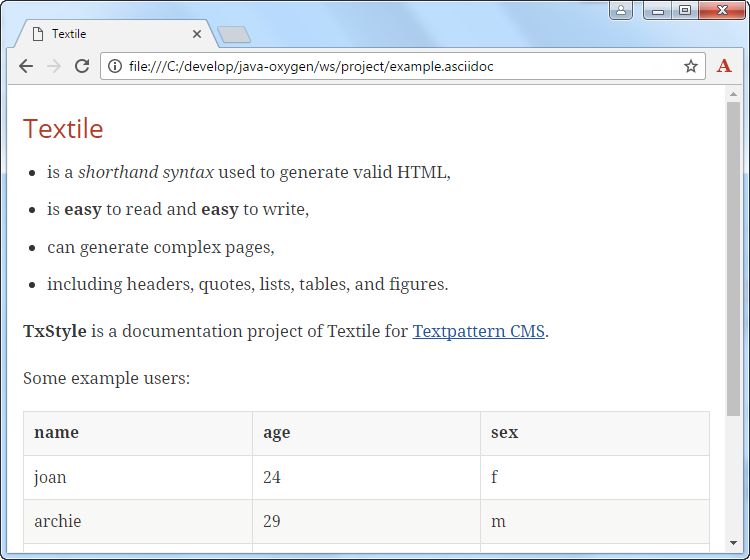
The final result is a web page (shown in the screenshot below), which already shows a fully functional form-based UI.

day1_form

Data we enter in this form is already bound to an underlying data object. JSON Forms automatically renders the correct control for each data type. For the enumeration, a drop down would show the valid values.  Additionally, the form will automatically validate the data we enter. As an example, we have specified in the data schema, that the name of a user is mandatory, therefore, JSON Forms will shows us an error marker, if we do not enter a value for the name property.

This form is already a good starting point, however, there are obviously some customization requirements. As an example, we might want to change the order of controls, their label, and the layout which they are shown in. Additionally, the description field shall be rendered as multi-line.

All this is possible with JSON Forms, and will be described on day 2 of this series. On day 3, we will also present the JSON Forms editor, which allows you to develop forms and their data schema more efficiently than writing JSON schemata by hand.

If you are interested in trying out JSON Forms, please refer to the Getting-Started tutorial. It explains how to set up JSON Forms in your project and how you can try the first steps out yourself. If you would like to follow this blog series, please follow us on twitter. We will announce every new blog post on JSON Forms there.

We hope to see you soon for the next day!


TwitterGoogle+LinkedInFacebook

Leave a Comment. Tagged with AngularJS, emf, Forms, JSON, JSON Schema, AngularJS, emf, Forms, JSON, JSON Schema

Orion: Announcing Orion 13

$
0
0

We are pleased to announce the thirteenth release of Orion, “Your IDE in the Cloud”. You can run it now on OrionHub or download the server to run your own instance. Once again, thank you to all committers and contributors for your hard work this release.  There were over 180 bugs and enhancements fixed, across more than 350 commits from 13 authors!

What’s new in Orion 13?  The Orion 13 release continues to emphasize our language tooling.  In particular, we now have code formatting, support for .jsbeautifyrc files and full ECMA 2016 support.  We have also been investigating LSP and have some experimental work in place to support Java, but this is not yet generally available.

The other focus of this release is consumability and accessibility. To make Orion easier to use for end users, admins and everyone in between, we substantially improved the node.js server (which is used on orion.eclipse.org or locally), created an experimental Electron app version of Orion, improved accessibility, enabled custom code folding in the code edit widget and a whole lot more!

Enjoy!

itemis: How to work with pointers in YAKINDU Statechart Tools

$
0
0

In my last article I covered how you can use arrays with our new version of Yakindu Statechart Tools Professional Edition. In this article the project will be expanded and some pointer magic will be included to add a control system that manages a robot's motors depending on the state of the sensor. 

What the setup looks like

Usually DC motors are controlled with an H-bridge circuit. In this setup, the motor has two variables – the running state and the current speed. The motor can be in brake, idle, forward- or reverse-running mode and the speed is normally controlled via PWM with an 8-bit number ranging from 0 to 255.

To describe this, two types are defined – an enum and a struct:typedef enum motormode {
STOP,
IDLE,
FWD,
RWD
} motormode_t;

typedef struct motor {
motormode_t mode;
uint8_t speed;
} motor_t;


The project's statechart

YAKINDU Statechart Tools-Pointers.png

Consider the following statechart declaration:

You can see that the variables motL and motR are defined as pointers to motor_t variables and that dist_p is a pointer to an unsigned int of 8 bit width. In this way they can be passed in simply after we allocated the statechart with the setter-functions and accessed from the statechart.


YAKINDU Statechart Tool-Pointers-state machine.png


Take a look at the statechart. On entry the statechart goes into the state p_test, short for pointer test. On the next cycle, the correct setting of the used pointers is checked. The user is intended to initialize them properly before entering the statechart from within his code. If the pointers are not set, this is considered a programming error, and thus the final state pointer_error is reached.

If that test is successful, the normal operation is entered: this means the state stop is activated. Instead of directly starting the motors, the robot waits for the go event – what absolutly makes sense: More than one robot has accidentally found the edge of the desk after a reset, which is probably not what you want it to do. This way, you can put the robot on a safe driving surface, before e.g. you push a button to activate the drive state.

In this state drive there are two possibilities – either there is no obstacle in front and the robot will drive straight or an obstacle is encountered and the robot will start to turn left until the measured distance value is high enough again. That’s a very simple design. More complex approaches could randomize the direction of turning or the duration, depending on the intended mode of operation.

Note how the three pointer-variables are accessed. The sensor measurement is read out with sensor.dist_p.value - value is a feature call on the pointer variable, returning its underlying real value (which could very well be another pointer). The same syntax allows to write through the motL and motR pointers to the real structs in the four states that alter the motor speed and mode. If there’s a variable and you need a suitable pointer you can use the feature call pointer similarly. 

The state sensor_error is entered when the in event sensorfault is raised. This is meant to be done by another component, which manages the sensors and monitors their behavior. Remember the last article: the sensor raised an error whenever its measured values’ standard deviation was too high, indicating a weird measurement. The managing unit could react on that event and raise the sensorfault event when the sensor raises its error event three times in a row, which would stop the robot before it crashes in a wall because it has suddenly become blind.

Why should you use pointers?

Now you know the projekt let's give you a little background knowledge why you should use pointers: the aim is to have a normal C function that regularly writes the desired motor settings to the hardware. When the motor_t variables are defined in the main-function, it can pass them in that hardware function and pass pointers to them to the statechart. That way, the statechart manages what it wants to do with the motors. The underlying function handles how it’s done and doesn’t need to know where the values come from.

A much simpler approach would be to access the statechart’s variables in the hardware function via its handle from the motor function, but this would come with the cost of a much tighter coupling between the system’s components. With the design used here, the motL and motR variables in the statechart can be renamed without the need to adapt the outer system, except for the two setter functions. You could even define your own operation that sets these pointers because operations in a statechart can return pointers and use them just like any other type.

Also, the measured distance value from the last article is meant to be passed in as a pointer, so the statechart doesn’t need to call any function to get access to it and doesn’t need to know its source either. The outer system manages the sensor and its operation, possibly raising the sensorfault-event mentioned earlier.

Summary

Let’s summarize what you learned in this article about pointers:

  • You can use and define pointers to any other usable type directly within the statechart, including arrays and other pointers. Arrays of pointers are possible as well.
  • You can test pointers for null like you’re used to.
  • You can pass pointers as function arguments and get them as a return value.
  • Pointers are dereferenced with value, and new pointers are created with pointer.
  • Pointers allow you to decouple your systems and save some function calls.

Want to try YAKINDU Statechart Tools? Start now! You can find this example in our example wizard!

Try the YAKINDU Statechart Tools  Professional Edition

VIATRA: VIATRA 1.5 released

$
0
0

The VIATRA project is happy to report that release 1.5.0 is now available with multiple new features and fixed bugs.

The most notable highlights of this VIATRA release include:

  • Model transformation debugger: This version greatly improved the model transformation debugger of VIATRA: now it is possible to debug transformations from other JVM instances.
  • Performance enhancements: Version 1.5 focused on query evaluation performance: various fixes aimed at reducing the memory requirements for Rete networks and improve the planning and execution time for the local search-based pattern matcher. In a complex proprietrary code base we measured a memory reduction of about 15-30%.
  • Query Language Updates: In version 1.5 the query language was extended with support for various number literals, e.g. long or float values.

For a more complete list of changes, see the dedicated New and noteworthy page, or have a look at the list of fixed issues.

All downloads are available now from the downloads area or the marketplace.

Feel free to reach out on the Eclipse Forums of VIATRA or the developer mailing list if you have questions, we will not leave any unanswered. You can also request industrial support for more advanced issues.

Maximilian and Jonas: EMF Forms and EMF Client Platform 1.11.0 released!

$
0
0

We are happy to announce that together with Neon.2, we have released EMF Forms and EMF Client Platform 1.11.0!

We want to thank our continuously active team of 12 contributors (36 contributors over all).

EMF Forms is a framework focused on the creation of form-based UIs. EMF Client Platform is designed to support the development of applications based on an EMF data model. If you are not yet familiar with EMF Forms, please refer to this tutorial for a introduction.

Both of these frameworks are part of Eclipse Modeling Tools Neon.2, but you can also find the new release on our download pages:

Please note, that we have began work on EMF Forms / ECP 2.0.0 in parallel to the 1.x development stream. We plan a 1.12.0 release along with Neon.3. Afterwards, we plan to focus on the 2.0.0 release stream. However, users do not have to worry too much about API breaks. There are two major changes that we wish to apply with 2.0.0. First, we plan to remove API, which is already marked as deprecated. So, if you still use any deprecated API, now is a good time to start refactoring here. Second, we will refactor the way “domain model references” are stored in the model. This will mainly allow us to bind to new data models. For this change, we plan to provide a migration for existing view models, so this change should be seamless for users of the framework.

As always, we will also blog about new features of the EMF Forms / ECP 1.11.0 release in the upcoming weeks! Please follow this blog or follow us on twitter to get notified about the new posts.


TwitterGoogle+LinkedInFacebook

Leave a Comment. Tagged with eclipse, emf, emfcp, emfforms, eclipse, emf, emfcp, emfforms


Benjamin Cabe: Eclipse IoT in 2016: A Year in Review

$
0
0

As we are wrapping up the year, it is a good time to reflect on all the great things that have happened to the Eclipse IoT community this year.

IoT logo

Eclipse IoT in 4 figures

The 26 different open-source projects that are hosted at Eclipse IoT total 2.3M+ lines of code. More than 250 developers have contributed code to the projects during the past 12 months, and during the same period, our websites have seen 1.3 million of visitors.

Contributions by company

It is always interesting to look at who is contributing to the Eclipse IoT projects. The commitment of companies such as Bosch Software Innovation, Eurotech, Red Hat, IBM, Intel, and many others to open source IoT really shows when you look at how much (working!) code they bring to Eclipse IoT.

Also interesting is the fact that 4 contributors out of 10 are not affiliated with any company – a great example of how pervasive open source is in IoT, with lots of people using the technology and helping improving it by providing patches, bug fixes, …

8 new projects joined the Eclipse IoT family

I am really excited to see how many new projects we onboarded this year, with a particular focus on IoT server technology, an area where very little had been available in open source until recently.

   ⇢ Eclipse Hono

Eclipse Hono provides a uniform API for interacting with devices using arbitrary protocols, as well as an extensible framework to add other protocols.

   ⇢ Eclipse Edje

Eclipse Edje provides an high-level API for accessing hardware features provided by microcontrollers (e.g GPIO, ADC, MEMS, etc.). It can directly connect to native libraries, drivers, and board support packages provided by silicon vendors.

   ⇢ Eclipse Milo

OPC Unified Architecture (UA) is an interoperability standard that enables the secure and reliable exchange of industrial automation data while remaining cross-platform and vendor neutral. Thanks to Eclipse Milo, people have access to all the open source tools necessary to implement OPC UA client and/or server functionality in any Java-based project.

   ⇢ Eclipse Whiskers

SensorThings API is an Open Geospatial Consortium (OGC) standard providing an open and unified framework to interconnect IoT sensing devices, data, and applications over the Web. It is an open standard addressing the syntactic interoperability and semantic interoperability of the Internet of Things. The Eclipse Whiskers project provides a JavaScript client and a light-weight server for IoT gateways.

   ⇢ Eclipse Kapua

Eclipse Kapua is a modular platform providing the services required to manage IoT gateways and smart edge devices. Kapua provides a core integration framework and an initial set of core IoT services including a device registry, device management services, messaging services, data management, and application enablement.

   ⇢ Eclipse Unide

The Eclipse Unide project publishes the current version of PPMP, a format that allows to capture data that is required to do performance analysis of production facilities. It allows monitoring backends to collect and evaluate key metrics of machines in the context of a production process. It is doing that by allowing to relate the machine status with currently produced parts.

   ⇢ Eclipse ioFog

The goal of Eclipse ioFog is to make developing IoT edge software feel like developing for the cloud, but with even more power.

   ⇢ Eclipse Agail

The Eclipse Agail project is a language-agnostic, modular software gateway framework for the Internet of Things with support for protocol interoperability, device and data management, IoT apps execution, and external Cloud communication.

Eclipse Paho & Eclipse Mosquitto are included in many vendors’ SDKs & starter kits

Can you spot a common denominator between these IoT platforms? Not only do they all support MQTT as a protocol to send data from the edge, but they also all provide SDKs that are built on top of Eclipse Paho and Eclipse Mosquitto.

A white-paper on IoT Architectures

This year, the Eclipse IoT Working Group members collaborated on a white paper that has been very well received, with tens of thousands of views and downloads. It is reflecting on the requirements for implementing IoT architectures, and how to implement the key functionality of constrained and smart devices and IoT backends with open-source software.

Ramping up in the Industrial IoT Space

As the different initiatives around “Industry 4.0” are becoming more mature, the ecosystem of open source projects available at Eclipse IoT (Eclipse neoSCADA, Eclipse Milo, Eclipse 4dic, etc…) is getting more and more traction. As an example, the 4diac team has demonstrated how to program a Bosch Rexroth PLC using 100% open source software at the SPS IPC Drives tradeshow this year.

Eclipse 4diac on IndraControl XM22 PLC from Bosch Rexroth and visualized using Eclipse Paho’s mqtt-spy

Virtual IoT now has 1,500+ members

The Virtual IoT meetup group has hosted dozens of webinars this year again. I highly encourage anyone to check out the recordings of our previous sessions – there is a lot of educational material there, delivered by world class IoT experts.

Trends for 2017

Next year I’m hoping to see a lot more happening in the aforementioned areas. More projects, of course, but also more integration of the current ones towards integrated stacks targeting specific verticals and industries. My colleague Ian also recently blogged on this topic.


One short last word: don’t forget to follow us on Twitter and Facebook to learn more about what is happening within our community.

Happy holiday season everyone!

Orion: New and Noteworthy in Orion 13.0

$
0
0

With Orion 13.0 released (just in time for the holidays), it is time again to share with you the new & noteworthy items developed during this release. There are lots of changes across all of Orion, so lets dive in to each area and see whats new.

Accessibility

We have been striving to make Orion as accessible as possible to all developers. In Orion 13.0 we have improved accessibility across the board – from standard labels to the code edit widget and everything in-between. We still have a ways to go, but plan to be fully accessible in Orion 14.0.

Code Edit Widget

The code edit widget just keeps getting better and better. In Orion 13.0 two great things happened: (1) You can finally see the keybinding dialog, and, (2) you can now add your own custom code folding!

To jump right in and start enhancing your use of the widget with some cool folding, check out the docs.

Electron

We have created an experimental version of Orion that runs as an Electron app!

The Experimental Orion Electron app

The experimental Orion Electron app

Currently, to use the app, you have to build and run it locally (we are working on providing regular builds of the app).

Language Server Protocol

A lot of work has gone into investigating and supporting the language server protocol since its announcement last summer.

In Orion 13.0 we have experimental support for the LSP and for Java that can be used on your local machine. For full details on how to get up and running, see this great readme.

Language Tools

Lots of cool new stuff is available in the language tools in 13.0.

Linting

We have provided 13 new linting rules (a coincidence, I promise), such as, no-extra-bind and no-implicit-coercion. The complete list of rules added in 13.0 can be found on our rules wiki.

The no-implicit-coercion linting rule

no-implicit-coercion (with fix)

To accompany the new linting rules, many new quickfixes have been added as well, allowing problems to be quickly and easily resolved.

The quotes linting rule quickfix

quotes rule quickfix

To keep all of the rules running smoothly, we also updated to ESLint 3.0.1

ECMA 2016

Orion 13.0 ships with complete support for ECMA 2016. To start developing using the new language features, you have to make sure to set the ecmaVersion entry in your .tern-project file to 7.

ECMA 2016 example snippet showing content assist

ECMA 2016 example

AST Outline

A lot of times, while working on language tooling features, developer have wondered what the backing AST looks like (to help diagnose whats wrong). In Orion 13.0 we have provided an AST outline for JavaScript, to make this task easier.

You can see the new outline using the View> Slideout> AST Outline menu item when working in JavaScript files.

The AST outline showing a simple snippet

AST outline

Code Formatting

One of the most sought-after features of an IDE is the ability to quickly fix the shape of code. One of the easiest ways to do that is code formatting. In Orion 13.0 we provided a platform API (orion.edit.format) to add formatting to any language, editor hooks to format-on-save, support to format selections of code and support for .jsbeautifyrc files (for project-level formatting options).

Orion ships with four language formatting implementations: (1) JavaScript, (2) HTML, (3) CSS, and (4) JSON.

Formatting can be used in one of three ways:

  1. Format-on-save: head into the editor options to enable this feature, then, as you save your work, it will also be formatted
  2. The Edit menu item: look for Format Code under the Edit main menu
  3. The pop-up menu: look for Format Code in the pop-up menu in the editor
Format code popup menu from the editor

Format code in editor

Not happy with the way the formatted code looks for JS/HTML/CSS/JSON? Simply head over to the formatting preference pages for each language and change the settings as desired.

The page with CSS formatting options on it

CSS formatting options

HTML Validator

In addition to updating our HTML parser in Orion 13.0, we also provided a pluggable HTML validator to help you keep your page source in tip top shape.

Example HTML validation

HTML validation

Like all our other validation, you can configure the HTML rules severities. The settings are found on the HTML Validation settings page.

Improved Internationalisation

All of the linting messages coming from the CSS tooling can now appear in other languages than English.

Updated Libraries

As we do each release, we have updated many of the libraries we use in our language tools. This time around we updated the following:

  • ESLint to 3.0.1
  • Doctrine to 1.2.2
  • ESTraverse to 4.2.0
  • Acorn to 3.3.0

Platform Improvements

Syntax Styling

Orion 13.0 has improved syntax styling support for many of our existing languages (like PHP and SQL) and also adds support for .sh files

Excluded Files

Any callers of the search API (via the file client) can now specify an array of names to be ignored by the search engine. This allows callers to ignore all kinds of things they don’t care about while speeding up the search for things they do.

The new property is named ‘exclude’ and is an array of strings. See the API doc for more information.

Filtered Resources

Sometimes there are things you just don’t want to see in your workspace (or that you shouldn’t see). In Orion 13.0 we provided the ability to filter / hide resources from appearing in the UI.

The preference for this is on the General settings preference page and is a simple comma-separated list of names of things to not show.

Shows general settings page and hidden resources preference

Resource names to hide

Light Theme

Orion now sports a shiny new light theme!

But don’t worry if you really really liked the old theme, in Orion 14 we are bringing back the theme preferences to allow this to be customized.

Antoine Thomas: Projects are now listed on user profile

$
0
0

As an example, I will share a screenshot of Dani Megert’s profile: he was the recipient of the lifetime achievement award at Eclipse Con Europe 2016. He is one of the top contributors to Eclipse.

When you browse a user profile, you can see the list of projects. And roles are listed on the right column. You will also notice that in the statistic block, there is a new counter for Projects. As usual, feedback is welcome.

I wish you a Merry Christmas and a Happy New Year 🎄 🎉

Maximilian and Jonas: JSON Forms – Day 2 – Introducing the UI Schema

$
0
0

JSON Forms is a framework to efficiently build form-based web UIs. These UIs are targeted at entering, modifying and viewing data and are usually embedded within an application. JSONForms eliminates the need to write HTML templates and Javascript for manual databinding to create customizable forms by leveraging the capabilities of JSON and JSON schema as well as by providing a simple and declarative way of describing forms. Forms are then rendered within a UI framework – currently based on AngularJS. If you would like to know more about JSON Forms the JSON Forms homepage is a good starting point.

In this blog series, we would like to introduce the framework based on a real-world example application, a task tracker called “Make It happen”. In the blog series pilot we started with day 0 and 1. On day 0, we described the overall requirements and on day 1 we completed the first iteration, which created a simple form for the entity “Task”. The result of day one was a fully functional form which looked like this:

day1_form

If you would like to follow this blog series please follow us on twitter. We will announce every new blog post on JSON Forms on twitter.

On this second day, we will show you how the rendered form can be customized, that is, how the controls and the layout of the created forms can be adapted.

So far, we haven’t specified anything for our forms, but rather, we just used the data schema and JSON Forms was able to produce a form out of it. However, you probably want to customize those forms sooner or later. As a very simple example, we might want to specify the order in which attributes are displayed or change the label of controls. Additionally, we would like the “description” property to be displayed as a multiline field. As this type of UI specifications are conceptually not in the underlying data schema, JSON Forms defines a second type of schema, the “UI schema”. The UI schema focusses on UI concerns only, it describes which properties of the data schema are displayed as controls, how they look and their layout. If you define a UI schema, it will be processed by JSON Forms to create an adapted version of the initial form. The UI schema references the underlying data schema to specify, which properties should be displayed in the UI. The following diagram shows a very simple UI schema, which specifies that the property “name” shall be displayed as a control in the UI:

jsonforms_blogseries_uischema

The following UI schema specifies the form described above based on the data schema:

{
  "type": "Control",
  "scope": {
    "$ref": "#/properties/name"
  }
}

As we have seen on day 1, such simple UI schemas can be automatically be derived from the data schema without specifying a specific UI schema. However, now we would like to change the default generated form. First, we want to change the order of attributes to:

  1. “name”
  2. “done”
  3. “description”

Second we don’t want to show the label of the “done” property, as the checkbox is self-explanatory. Finally, we want to show the description property as a multi-line control. All of these things can very easily be done in the UI schema. Below, you can see the UI schema and the resulting form containing all the above mentioned UI customizations.

{
  "type": "VerticalLayout",
  "elements": [
    {
      "type": "Control",
      "scope": {
        "$ref": "#/properties/name"
      }
    },
    {
      "type": "Control",
      "label": false,
      "scope": {
        "$ref": "#/properties/done"
      }
    },
    {
      "type": "Control",
      "scope": {
        "$ref": "#/properties/description"
      },
      "options": {
        "multi":true
      }
    }
  ]
}

jsonforms_blogseries_day2_form

If you are interested in trying out JSON Forms, please refer to the Getting-Started tutorial. It explains how to set up JSON Forms in your project and how you can try the first steps out yourself. If you would like to follow this blog series, please follow us on twitter. We will announce every new blog post on JSON Forms there.

We hope to see you soon for the next day!


TwitterGoogle+LinkedInFacebook

Leave a Comment. Tagged with AngularJS, emf, emfforms, Forms, JSON, JSON Schema, AngularJS, emf, emfforms, Forms, JSON, JSON Schema

vert.x project: Internet of Things - Reactive and Asynchronous with Vert.x

$
0
0

Vert.x IoT

this is a re-publication of the following blog post.

I have to admit … before joining Red Hat I didn’t know about the Eclipse Vert.x project but it took me few days to fall in love with it !

For the other developers who don’t know what Vert.x is, the best definition is …

… a toolkit to build distributed and reactive systems on top of the JVM using an asynchronous non blocking development model

The first big thing is related to develop a reactive system using Vert.x which means :

  • Responsive : the system responds in an acceptable time;
  • Elastic : the system can scale up and scale down;
  • Resilient : the system is designed to handle failures gracefully;
  • Asynchronous : the interaction with the system is achieved using asynchronous messages;

The other big thing is related to use an asynchronous non blocking development model which doesn’t mean to be multi-threading but thanks to the non blocking I/O (i.e. for handling network, file system, …) and callbacks system, it’s possible to handle a huge numbers of events per second using a single thread (aka “event loop”).

You can find a lot of material on the official web site in order to better understand what Vert.x is and all its main features; it’s not my objective to explain it in this very short article that is mostly … you guess … messaging and IoT oriented :-)

In my opinion, all the above features make Vert.x a great toolkit for building Internet of Things applications where being reactive and asynchronous is a “must” in order to handle millions of connections from devices and all the messages ingested from them.

Vert.x and the Internet of Things

As a toolkit, so made of different components, what are the ones provided by Vert.x and useful to IoT ?

Starting from the Vert.x Core component, there is support for both versions of HTTP protocol so 1.1 and 2.0 in order to develop an HTTP server which can expose a RESTful API to the devices. Today , a lot of web and mobile developers prefer to use this protocol for building their IoT solution leveraging on the deep knowledge they have about the HTTP protocol.

Regarding more IoT oriented protocols, there is the Vert.x MQTT server component which doesn’t provide a full broker but exposes an API that a developer can use in order to handle incoming connections and messages from remote MQTT clients and then building the business logic on top of it, so for example developing a real broker or executing protocol translation (i.e. to/from plain TCP,to/from the Vert.x Event Bus,to/from HTTP,to/from AMQP and so on). The API raises all events related to the connection request from a remote MQTT client and all subsequent incoming messages; at same time, the API provides the way to reply to the remote endpoint. The developer doesn’t need to know how MQTT works on the wire in terms of encoding/decoding messages.

Related to the AMQP 1.0 protocol there are the Vert.x Proton and the AMQP bridge components. The first one provides a thin wrapper around the Apache Qpid Proton engine and can be used for interacting with AMQP based messaging systems as clients (sender and receiver) but even developing a server. The last one provides a bridge between the protocol and the Vert.x Event Bus mostly used for communication between deployed Vert.x verticles. Thanks to this bridge, verticles can interact with AMQP components in a simple way.

Last but not least, the Vert.x Kafka client component which provides access to Apache Kafka for sending and consuming messages from topics and related partitions. A lot of IoT scenarios leverage on Apache Kafka in order to have an ingestion system capable of handling million messages per second.

Conclusion

The current Vert.x code base provides quite interesting components for developing IoT solutions which are already available in the current 3.3.3 version (see Vert.x Proton and AMQP bridge) and that will be available soon in the future 3.3.4 version (see MQTT server and Kafka client). Of course, you don’t need to wait for their official release because, even if under development, you can already adopt these components and provide your feedback to the community.

This ecosystem will grow in the future and Vert.x will be a leading actor in the IoT applications world based on a microservices architecture !

Viewing all 6595 articles
Browse latest View live


Latest Images