LocationTech announces new project releases that provide core technology for geospatial big data analytic solutions.![]()
↧
Eclipse Announcements: Open Source Community Accelerates Big Data Analytics for Geospatial Solutions
↧
Eclipse Announcements: Eclipse Newsletter | Capella: open source MBSE solution
Learn everything about Capella, an open source workbench based on Eclipse technology that allows engineers to design complex systems.![]()
↧
↧
Paolo Patierno: IoT weekend 2017 : my session about messaging and IoT … video and slides !
Today I had a really interesting experience thanks to Jorge Maia who, few weeks ago, invited me to have a session for the online Brazilian event IoT Weekend. Of course, I accepted his invitation in order to speak about “Open sourcing the messaging and IoT” focusing on IoT protocols, patterns and related platforms like EnMasse and Eclipse Hono.
The event is still going on while I’m writing this blog post (for all this weekend) but my session ended less than one hour ago so I’d like to share the material for all the attendees and for the other people who lose the session and could be interested to watch it !
So you can find the video on YouTube here and the slide deck on SlideShare here.


↧
Kai Kreuzer: openHAB 2.2 Release
Half a year has passed since openHAB 2.1 and I am very happy that we still made it before Christmas, so that you have something nice to play with during the holiday season: openHAB 2.2 is out!
The most obvious change that you will immediately notice is the rollout of our new openHAB logo, which you will now find in all our apps, UIs and websites.
![]()
But the functional evolution is of course of much more importance, and a lot has happened in the past months.
While you can find all the details in the official Release Notes, let me highlight a few of those features.
New Features for Setup & Configuration
Huge effort went into the user experience when setting up and configuring openHAB:
Language Server Protocol (LSP) Support and VS Code Extension
One major step forward is the introduction of Language Server Protocol (LSP) support in the core runtime. This allows text editors to remotely connect and do syntax validation and content assist on our configuration files, which is specifically useful when writing rules. Since these were the main features of the former Eclipse RCP-based “openHAB Designer”, this tool has been discontinued and the VS Code Extension becomes its official successor.
 Visual Studio Code Extension for openHAB
Besides the “usual” features like code highlighting, syntax validation and content assist, the openHAB VS Code Extension uses the connection to the openHAB server to provide many more great features like browsing through the available items & things, showing live previews of sitemaps and many more - you should definitely check it out!
Home Builder
Another new tool for getting started is the Home Builder, which let’s you easily define the whole structure of your home (floors, rooms, objects) and then creates the according item and sitemap files by the click of a button. No tedious typing or copying&pasting necessary anymore - and the risk of typos is gone! The Home Builder is automatically installed when the “Standard” installation package is chosen, all others can install it as an optional add-on.
 The new Home Builder generates configuration files to start from
openHABian
Talking about an easy start with openHAB, I clearly have to mention openHABian, which has just been released in parallel: openHABian 1.4 is available for all Raspberry Pi models from 0W to 3 as well as for the PINE A64. Its setup is smoother than ever and it by now includes an abundance of options to install next to openHAB, like Node-RED, KNXd, Grafana and FIND, just to name a few. It now also includes those directly in the openHAB dashboard, so that all of them are easily accessible from a single place.
 Populated dashboard in openHABian
New Device Integrations
Of course there are again news on the binding side as well. Some bindings like DMX, Nest and Plugwise existed before, but they are now fully rewritten and support openHAB 2 features like discovery and UI-driven configuration. Other bindings are completely new like e.g. the (specifically in Austria) very popular Loxone system or the webOS-based LG TV support. All Apple users might find the new iCloud binding very useful as it provides a very simple way to do location tracking of people (or rather their devices) and through which you can also trigger “find my iPhone” in case you forgot where you have put your mobile.
 Location tracking through the iCloud Binding
The release notes furthermore contain a detailed list of all noteworthy enhancements and fixes that have been done on the existing add-ons.
… and more
Last but not least I should mention that we also have updates for the iOS app and the Android app available in the app stores - especially the Android app has evolved a lot and it is awesome to see many new contributors being involved in it - check out all the new features and fixes in its release notes.
For the 2.2 release, we plan to come up with 2.2.x updates, which can potentially fix critical issues that are found, but which will more importantly add further bindings that are going to be merged during the next weeks. Our aim is to make the time that it takes for a new binding to become available to our release users much shorter than it is today. So stay tuned for further news on this!
I hope that you like all those updates and I really think that openHAB becomes much better with every release. This wouldn’t be possible without its great community. So let me end my annoucement by thanking all contributors that drive the project forward - be it through code contributions, work on the documentation or simply by reporting bugs and involving themselves in discussions. Merry christmas to all of you!

↧
Melanie Bats: Dear Santa
Dear Santa Claus,
My name is Mélanie and I am a little bit too old for that. It’s been a long while since I last wrote to you. This year I have been really naughty nice.
All I want for Christmas is:
An Eclipse Sirius 6.0 version for June 2018 compatible with Java 8, 9, 10 (a big fat hen), 11… and Eclipse Oxygen & Photon.
Improved Xtext compatibility with Sirius. I want to thank you Santa as I already received my first present in advance this year with the white paper about how to integrate Xtext & Sirius editors.
UX improvements: For Sirius 6 I would like to include some UX improvements that we have initially developed for some of our customer specific workbenches.
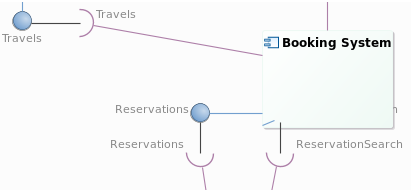
- Magic connectors: When I select two elements, it would propose automatically the types of connectors that could be created according to my metamodel. My user no longer needs to know exactly the metamodel to be able to create new edges between his elements.
![Magic connectors]()
- Rotatable ports: Port which changes automatically its angle according to its position in its container or the connected edges.
![Rotatable ports]()
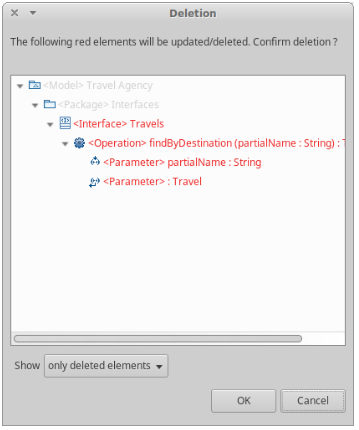
- Deletion confirmation dialog: Dialog which can be activated thanks to a global preference. When it is activated each time the user will delete a semantic element, this dialog pops up showing all the consequences of the deletion and asking for confirmation.
![Deletion confirmation dialog]()
A 1 click product: To easily create my own product based on Sirius, I have a dream… once I defined my Sirius based modeler, I click once on a button and it generates all I need to provide a bundle to my end-users.
An Early Access Program: We are also preparing a new web page on the Sirius website in order to provide a preview of what we are developing. You would have the ability to test the features before they are released by downloading the beta Obeo Designer Community Edition. You would no longer need to until June to get the new features, you will be able to test them earlier and give us feedback.
Reconcile Light Client vs Rich application : We decide to try to reconcile the two worlds… For Sirius 6 we are working on a new solution to use Sirius definition with HTML Renderer within Sirius workbenches. We will use an hybrid model to be able to get the best of both worlds and make them coexist.
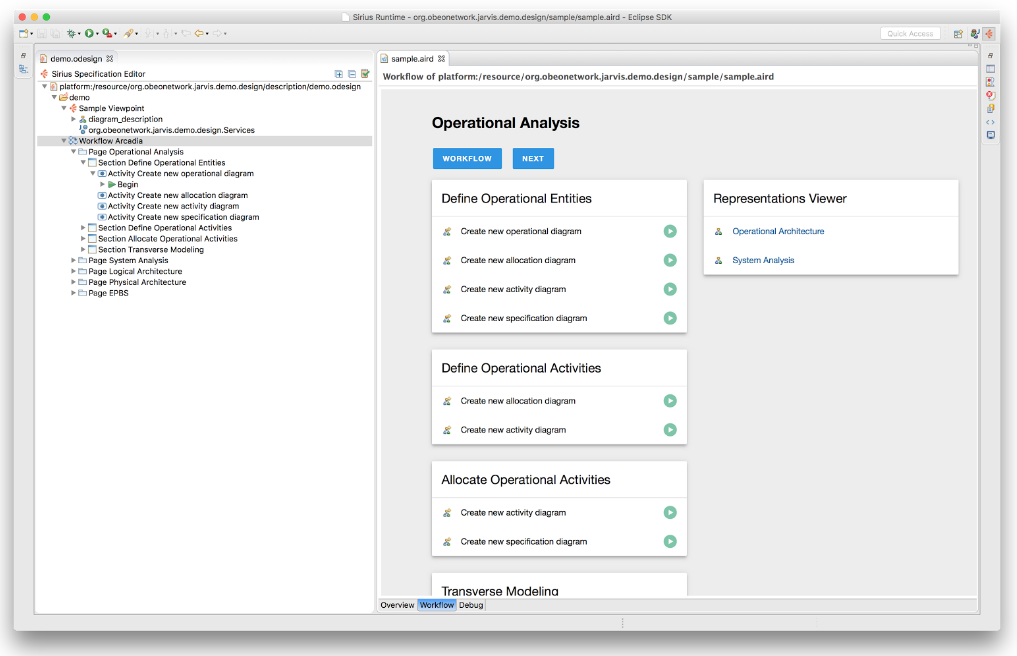
A new DSL to define Workflows for your Sirius based workbenches: You will be able to create a workflow directly in your Sirius definition and it will be rendered in HTML in the Sirius dashboard. Thanks to Santa’s elves, a demo of the first prototype is already available.
Diagram in the web: For Sirius 6, we are exploring an integration with Sprotty integration in Sirius designers to ease model exploration and documentation. At the moment we are focused on pure visualization, as a first step. But remember that this is exactly what we said at the beginning of Sirius: “pure visualization, no edition” but you know where we are today…
Many answers to the Sirius Community Survey: If you have one Santa Claus letter to write this is the one! We have lots of ideas for the future of Sirius. But what we need is to know what YOU need? So please speak up! Tell us what you want by filling our survey!
Chocolates (Dear Santa, you can find my postal address on the Obeo website, I promise I will share them with the Obeo folks ;))
And in the end… a real stuffed Unicorn, I particularly love the Fluffy one.

Please say hello to everyone at the North Pole, to Mrs. Claus, the elves, and all the reindeers, especially Rudolph. I am excited to see what is under the tree this year!
Love always,
Mélanie
PS: Santa do not be afraid, the Obeo elves would support you to release a great Sirius 6! I will leave some carrots for the reindeers next to your milk and cookies!

↧
↧
Ian Skerrett: IoT Trends for 2018
Last year I made the bold move to write-up the 2017 trends I thought would be important for the IoT industry and Eclipse IoT community. It seemed like a useful exercise so I thought a 2018 version is appropriate.
1. Edge/Fog/IoT Gateway computing will continue to gain traction. It is not feasible that all IoT devices will be communicating directly with the cloud. The amount of data, network availability and latency, security are some of the primary drivers for pushing IoT compute toward the edges of the network. For example, an IoT solution for an oil rig needs to work regardless of connectivity to the cloud.
Companies like Dell, who happen to see hardware for gateways are announcing significant investment in edge computing. Silicon Valley VCs are now saying edge computing is the next big thing and potentially the end of cloud computing. FWIW, I don’t see cloud computing ending anytime soon.
I think we will continue to see Eclipse Kura and Eclipse ioFog being embraced for edge computing. In 2018, I hope we will see Eclipse Kura running Eclipse DeepLearning4J providing a great IoT machine learning platform at the edge.
2. Digital Twins will become a thing. I expect to see the IoT industry talk more about the term ‘digital twin‘. Most of the major IoT vendors claim support for digital twins: GE, IBM, Bosch, Amazon, MS. It will be interesting to see if the IoT industry will agree to a common definition for digital twin and even some common standards. Some common standards would enable a more robust vendor ecosystem for digital twins.
For Eclipse IoT, the Eclipse Ditto project is a new project that provides a framework for managing and creating digital twins. The code based is from the Bosch implementation of their digital twin solution. You can check out their first milestone release.
3. Eclipse IoT Integration. The Eclipse IoT open source projects are maturing to the point where many are providing stable production ready functionality. We are seeing more and more interest in the community to focus on integration between the projects. I see this as a very positive sign and expect to see more cross-project collaborations in 2018. Is is possible the Eclipse IoT WG organizes the first Eclipse IoT release train in 2018?
4. More Open IoT Testbeds. In 2017, the IoT WG launched two open IoT Testbeds: 1) Asset Tracking and 2) Industry 4 Production Performance Management. These testbeds have successfully demonstrated how open source and commercial solutions can be integrated to solve a real IoT solution. In 2018, I hope we see more end-user organizations proposing and leading testbeds that show how a community of vendors can solve their IoT requirements.
5. Technology to watch in 2018. It is difficult to ignore the hype around blockchain. However it has not been clear how that blockchain technology scales up and down to meet the requirements of IoT. IOTA’s tangle technology seems to have an approach that may work for IoT. Robert Bosch Venture Capital announcement that they have purchased IOTA tokens to invest in the future of IoT seems pretty significant.
Low-power Wide-Area Network (LPWAN) technology also seems to be ready for wide adoption. There appear to be a lot of momentum around LoRaWAN. The Things Network community continues to drive forward an open source community for LoRaWAN. With more roots in the cellular industry, NB-IoT appears to be the alternative to LoRaWAN. Wide adoption of both technologies will be a positive influence on enabling more IoT use cases.
2018 will be another exciting year for IoT. My bold prediction is that 2018 is going to be the year that companies will start talking about their IoT success stories. Enjoy!


↧
vert.x project: TCP Client using Eclipse Vert.x, Kotlin and Gradle build
As part of my hobby project to control RaspberryPi using Google Home Mini and/or Alexa, I wanted to write a very simple TCP client that keeps a connection open to one of my custom written server in cloud (I will write another blog post to cover the server side on a later date). The requirement of the client is to send a shared secret upon connecting and then keep waiting for message from server. Vert.x, Kotlin and Gradle allow rapid development of such project. The generated jar can be executed on Raspberry Pi. These steps outline the project setup and related source code to showcase a Vert.x and Kotlin project with Gradle.
Project Directory Structure
From command line (or via Windows Explorer, whatever you prefer to use) create a directory for project,for instance vertx-net-client. Since we are using Kotlin, we will place all Kotlin files in src/main/kotlin folder. The src/main/resources folder will contain our logging configuration related files.
cd vertx-net-client
mkdir -p src/main/kotlin
mkdir -p src/main/resources
Project Files
We need to add following files in the project
.gitignoreIf you want to check your project into git, you may consider adding following.gitignorefile at root of your project
logback.xmlThis example is using slf4j and logback for logging. If you decide to use it in your project, you may also add following logback.xml file insrc/main/resources. Modify it as per your requirements. This example will log on console.
Gradle Setup
We will use Gradle build system for this project. If you don’t already have Gradle available on your system, download and unzip gradle in a directory of your choice ($GRADLE_HOME is used here to represent this directory). This gradle distribution will be used as a starting point to create Gradle wrapper scripts for our project. These scripts will allow our project to download and use correct version of gradle distribution automatically without messing up system. Really useful when building your project on CI tool or on any other developer’s machine.
Run following command in project’s directory
$GRADLE_HOME/bin/gradle wrapperThe above commands will generate following files and directories.
gradle/ gradlew gradlew.batGradle build file build.gradle
Create (and/or copy and modify) following build.gradle in your project’s root directory. Our example gradle build file is using vertx-gradle-plugin.
In the project directory, run following command to download local gradle distribution:
./gradlewvertx {
mainVerticle = "info.usmans.blog.vertx.NetClientVerticle"
}From the above example, the package name is info.usmans.blog.vertx
Add a new Kotlin Class/file in src/main/kotlin/info/usmans/blog/vertx as NetClientVerticle.kt
The contents of this class is as follows
Explaining the Code
The fun main(args: Array) is not strictly required, it quickly allows running the Vert.x verticle from within IDE. You will also notice a small hack in the method for setting system property vertx.disableDnsResolver which is to avoid a Netty bug that I observed when running on Windows machine and remote server is down. Of course, since we are using vertx-gradle-plugin, we can also use gradle vertxRun to run our verticle. In this case the main method will not get called.
The override fun start() method calls fireReconnectTimer which in turn calls reconnect method. reconnect method contains the connection logic to server as well as it calls fireReconnectTimer if it is unable to connect to server or disconnects from server. In reconnect method the socket.handler gets called when server send message to client.
socket.handler({ data ->
                        logger.info("Data received: ${data}")
                        //TODO: Do the work here ...
               })
Distributing the project
To create redistributable jar, use ./gradlew shadowJar command. Or if using IntelliJ: from Gradle projects, Tasks, shadow, shadowJar (right click run). This command will generate ./build/libs/vertx-net-client-fat.jar.
Executing the client
The client jar can be executed using following command:
java -DserverHost=127.0.0.1-DserverPort=8888-DconnectMessage="hello" -jar vertx-net-client-full.jarIf you wish to use SLF4J for Vert.x internal logging, you need to pass system property vertx.logger-delegate-factory-class-name with value of io.vertx.core.logging.SLF4JLogDelegateFactory. The final command would look like:
java -DserverHost=127.0.0.1-DserverPort=8888-DconnectMessage="hello" -Dvertx.logger-delegate-factory-class-name="io.vertx.core.logging.SLF4JLogDelegateFactory" -jar vertx-net-client-full.jarYou can configure Vert.x logging levels in logback.xml file if required.
Conclusion
This post describes how easy it is to create a simple TCP client using Vert.x, Kotlin and Gradle build system. Hopefully the techniques shown here will serve as a starting point for your next DIY project.
| Info This post is adapted and reproduced from author’s blog post |
↧
Maximilian and Jonas: EMF Forms and EMF Client Platform 1.15.0 released!
We are happy to announce that together with Oxygen.2, we have released EMF Forms and EMF Client Platform 1.15.0!
We want to thank our continuously active team of 10 contributors (38 contributors over all) for completing on 20 bug reports and feature requests.
It is amazing to look at the on-going history of this successful project, since version 1.0.0, we have completed over 1.4k feature requests and bug reports, 38 contributors have submitted 10k commits and developed 666k lines of code. EMF Forms continues to be one of the most active projects at Eclipse.
Once i a while it is fun to look at the commit history of a project. A cool project to visualize this is Gource. It generates a nice graph-based view of your repository and shows modifications done by different contributors. The following video visualize 6 years in 3 minutes. This is of course very fast, but you can still observe the different phase of the project, for example the regular release (which result in changes in all MANIFEST files).
In case you don’t know EMF Forms: It is a framework focused on the creation of form-based UIs. EMF Client Platform is designed to support the development of applications based on an EMF data model. If you are not yet familiar with EMF Forms, please refer to this tutorial for a introduction.
Both of these frameworks are part of Eclipse Modeling Tools Oxygen.2, but you can also find the new release on our download pages:
As always, we will also blog about new features of the EMF Forms / ECP 1.15.0 release in the upcoming weeks! Please follow this blog or follow us on twitter to get notified about the new posts.
↧
vert.x project: Eclipse Vert.x based Framework URL Shortener Backend
AWS Lambda & Vertx Framework URL Shortener Backend
Intro
Recently I stumbled upon Vertx. Event-driven, asynchronized, lightweight, reactive, highly performant, polyglot application framework. Ideal for writing micro-services. I played around with it for a while and really enjoyed the concept of serverless applications.
I developed a few apps and cases and started to wonder how to run and deploy them so that I get a 100% reliable service. I suddenly remembered the tech seminar that I attended recently, specifically session about serverless apps with AWS (Amazon Web Services) Lambda. Lambda is a serverless compute service that runs your code in response to events and automatically manages the underlying compute resources for you. Fairly similar concepts Vertx and AWS Lambda, so maybe they complement each other? As it turns out they do, Vertx can get most of your Lambdas…
Using the Serverless Framework to create, manage and deploy your new Lambdas I was able to get this micro-service up and running in no time.
Enough with the talk, lets see the implementation.
Code
Handler Class, entry point of AWS Request.
The first issue that I had was the sync Event Handler that is provided by AWS. So I had to by pass it with Future. In the Handler class I first initiate Vertx instance in a static block and deploy few Verticles that will do the work. This class only receives the event, extracts needed data from the request and passes the data to Vertx EventBus. After the Consumers handle the request, Handler class will generate a proper response and finish the AWS request.
Line 4-18: This is where Vertx instance is created, Verticles are deployed and Async JDBC client is created. I figured out that it is better to created JDBC client here as in some cases I was timeout when that logic was in the Verticle start method.
Line 27-36: These are helper lines, parsing and formatting the data so I can pass it to the Verticles.
Line 38-45: I have decided to map the consumers to the address that is made of request method and url path, example POST/api. This means each API request is mapped to its own consumer in Verticle class.
Line 47-77: This is nothing but a block of code that handles the response that was passed from Verticles to the Future and generates the final response that will be return to API Gateway.
UrlService, Vertx Verticle.
Verticle class is pretty forward. Consumers that will process the message, methods for working with JDBC and helper methods for hashing/dehashing id. The logic behind url shortening is fairly simple here. Each long url is stored in database with a unique id and few additional columns. Row id is hashed and returned as short url. When retrieving long url hash is decoded to row id and long url is retrieved. Later user is redirected to long url. With this implementation, on 6 char short url (characters after the domain) you get 62^6 combinations which is 56 800 235 584 rows for storing your urls. TinyURL is currently at 6 long char urls (characters after domain). You can of course implement methods for reusing and recycling ids.
As said, this is all fairly straight forward, if you are already familiar with Vertx. If you are thinking why have I repeated the code for establish a JDBC connection, here is the explanation (line: 10-16). I was getting Timeouts when creating JDBC connection in Verticles. To avoid this I also added this code to my Handler class. This way connection is created there and because of the Vertx implementation any later attempt to create it again will result in just getting the instances from the first invocation. This escaped the need to pass the instances directly from the Handler class when creating Verticle instances.
Serverless configuration.
Lastly I would like to share the serverless.yml, confirmation file that allows seamlessly deploy and management of AWS Lambda. With just a few commands and lines of configuration you are able to configure all necessary steps for deploying your AWS Lambda. Framework takes care of making configuration of Api-Gateway and other AWS hassle that would otherwise needed to be done by hand. In this case Lambda is invoked by HTTP events.
Performance and Tests
Vertx async capabilities eased the stress and memory needs of traditional AWS Lambdas with sync methods. After performing load tests Lambdas that were written using Vertx framework preformed 10% faster and consumed 40% less memory. As I have read somewhere in Vertx documentation, Sync methods will definitely finish the first request faster but in total Async will be faster in the end. This savings in memory and time will definitely reduce the cost of running your Lambdas and the little overhead with additional code is for sure worth it.
Conclusion
To follow the pace of demanding needs for fast and resilient services we need to move from traditional Monoliths. Embracing the micro service architecture alone will not cut it, not anymore. With the rise and rapid advancement of Cloud solutions it has never been so easy to make a truly Serverless systems build upon network of micro services. As you have seen Vertx with its async API makes the full advantage of AWS Lambdas, embracing them while also improving the performance and lowering the costs. With the help from Serverless Framework writing, deploying and managing your Lambdas has never been so easy.
If you are interested in the whole project, you can find it on GitHub.
| Info this is a re-publication of the following blog post |
↧
↧
Maximilian and Jonas: EclipseSource Oomph Profile – updated to Oxygen.2
Yesterday, Oxygen.2 has been released, a new version of the Eclipse IDE and platform. It contains many useful improvements, so it is worth to update.
One small but useful improvement we especially like is the enhanced EGit staging view. It provides new buttons to stage and unstage files (selected one or all), as well as to sort the unstaged changes. Further, the context menu directly allows to ignore files, assume them to be unchanged and even directly delete them.

Futher improvements, e.g. for Java 9 support are summarized in the following video provided by Holger Voormann:
In case you use our EclipseSource Oomph profile (see here for more details), you should get a notification and Oomph will apply the update automatically. If you do not get the notification, just navigate to the menu entry “Help” => “Perform Set-Up Task”.
This will automatically update all plugins to Oxygen, but keep all existing settings untouched.

Have fun with Oxygen.2!
↧
Holger Voormann: Eclipse Oxygen.2 IDE Improvements: Java IDE, Git, C/C++
As usual, I have made a short video that shows some IDE improvements of the latest Eclipse release (thanks to all of you who have contributed) in action:

Java IDE:
- Fixed: ClassNotFoundException with a JAR in another project and with Java 9 (bug 525844)
- Fixed: Exporting runnable JAR (bug 525711)
- Fixed: Running Ant in a non-Java project in a separate JRE (bug 522581)
- Fixed: In module-info requiring a not by default resolved Java 9 module (bug 526054)
- Drag and drop of entries between modulepath and classpath (bug 522593)
Git (see also EGit 4.9):
- Git Staging view: add/remove all/selected buttons
- Git Staging view: right-click menu with ‘Assume Unchanged’ and ‘Untrack’
- Repository switcher in the Git Staging, Git Reflog, Interactive Rebase and History views
- Redesigned icons: disable filtering, add/clone/create a repository
C/C++ (see also CDT 9.4):
- Docker Container Launch Support
- Suppress problem comments
- ‘decltype’ improvement: showing and navigating to the declaration
- Code formatter as a command line application
In case you missed it:


Next releases (calendar / ICAL):


↧
Benjamin Cabe: Monetizing IoT Data using IOTA
There is a lot of buzz around cryptocurrencies – will BTC be over $20,000 by the time this blog post goes live?  – these days, but beyond the hype, one thing is pretty clear: it enables a decentralized economy that is particularly interesting to look at from an IoT perspective.
For the Internet of Things, I believe the role of cryptocurrencies and distributed ledgers is threefold:
- monetization of IoT data– cryptocurrencies make it really easy to implement scenarios where data producers can get a financial compensation in exchange for the value provided by the data they expose. Think of a weather station you would put on your balcony: people or corporations could have access to the feed of sensor data in exchange for some tokens.
- smart contracts– taking monetization a step further, smart contracts can enable higher-order, secured, transactions to automatically take place on the network. If you take the example of the weather station, you could sign a smart contract with a 3rd party whereby you get paid for giving access to your sensor data if and only if you can provide an uptime of at least 99%. Note that this would probably require a trusted third party responsible for checking your uptime and storing it in the ledger.
- security– manufacturers can use a distributed ledger to store information that can be used to help securely bootstrap IoT devices, by e.g allowing customers to check the authenticity of a chip.
In this blog post, we will focus on the first topic: monetizing IoT data.
For that, we will look at leveraging IOTA’s distributed ledger. We will be showing how anyone can be given access to “simple” IoT sensor data on an MQTT broker, while only people who are paying for it will be able to access the live, raw, data stream.
Use case
We will be basing this article on the use case of someone, let’s call her Jane, willing to give access to a live sensor data stream coming from a smart plug, granted that she gets some money (iotas) in return :smile:.
The instant power consumption metrics will be published to an MQTT broker twice per second, making for a pretty accurate sampling that people might be interested in buying. On the same MQTT broker, Jane will also be making available the 1-min moving average of the power consumption for anyone to access, even if they don’t necessarily want to pay extra money.
When John, who is maybe a data scientist interested in getting his hands on “real” data wants to get the power consumption from Jane’s smart plug, he has two options:
- access the MQTT broker and subscribe to data published on the ‘public’
sensor/1mtopic, for free, - send some IOTAs to Jane (she’s decided that 500 iotas is what people should pay to access the data for one hour), for his MQTT client to be granted access to
sensor/livetopic where the live, and more valuable to him, data stream is being published.
Technology being used
- Eclipse Mosquitto as our MQTT broker of choice.
- Two IOTA wallets, one where the payments to Jane shall be sent to, and one for John to pay for accessing sensor data
![]() mosquitto-auth-plug, a flexible authentication plug-in for Mosquitto. We will use it for implementing a flexible access-control model, based on the information available on the IOTA tangle (i.e payments)
mosquitto-auth-plug, a flexible authentication plug-in for Mosquitto. We will use it for implementing a flexible access-control model, based on the information available on the IOTA tangle (i.e payments)
- The ACLs (access-control lists) will be stored in a MongoDB database, used as the authentication backend for mosquitto-auth-plug
- A Belkin WeMo Insight smart plug.

Demo
Enough with the words! I’ve put together a video that shows the whole scenario in action. While you will quickly realize that I do a bad job impersonating Jane and John, what I hope you notice is that this is a real demo, and anyone can implement something similar today.
The technology is here, and while it has some limitations, I do think it’s worth exploring what new scenarios it enables.
Check out the code
I have published all the code behind this proof-of-concept on my Github repository, please check it out and open pull requests or issues if you happen to give it a try!
Next steps?
This is obviously a simple proof-of-concept, and I am almost certain it is not free of security issues. I would certainly be happy to hear from you if you have feedback :smile:.
I see at least two things that would be worth improving:
- IOTA transactions, just like with many other distributed ledgers, can take a significant amount of time before they get confirmed. Having to wait for a couple hours after you’ve made a payment to effectively get access to the data can seriously impact the user experience. A nice improvement would be to rely on IOTA Flash Channels, as they allow to perform instantaneous, off-tangle transactions.
- In the current PoC, the Mosquitto server only accepts connections from a list of users already agreed upon. This wouldn’t be difficult, and much smarter, to allow anonymous access to anyone, and let clients interested in having full access to the data indicate in their payment message the username/password they plan on using when reconnecting as authenticated clients. This information should, of course, be encrypted with a key only known to the client and the server – this key, unique for each client, could be broadcasted to anonymous clients on the $SYS topic, for example…
Do you see other areas for improvement? Have you seen similar solutions implemented with other cryptocurrencies?
Note that the IOTA folks have recently announced an IoT data market that seems to implement a similar idea, but I haven’t had time to look into it closely.
The post Monetizing IoT Data using IOTA appeared first on Benjamin Cabé.
↧
Donald Raab: Happy Holidays!
It’s time for some Java Reindeer games.
 A Festival of lights in New York
This blog is going to be mostly code. I am going to demonstrate some Eclipse Collections and Java Stream APIs, with a holiday twist. I’ll start by implementing a Reindeer Enum in Java with some help from Eclipse Collections.
public enum Reindeer
{
Dasher, Dancer, Prancer, Vixen, Comet, Cupid, Donner, Blitzen,
Rudolph;
    public static ImmutableList<Reindeer> all()
    {
        return theMostFamousReindeerOfAll()
                .newWithAll(theOtherReindeer()
                        .flatCollect(Reindeer::toList));
    }
    private static ImmutableList<Twin<Reindeer>> theOtherReindeer()
    {
        return Lists.immutable.with(
Dasher.and(Dancer),
Prancer.and(Vixen),
Comet.and(Cupid),
Donner.and(Blitzen));
    }
    private static
    ImmutableList<Reindeer> theMostFamousReindeerOfAll()
    {
        return Lists.immutable.with(Reindeer.Rudolph);
    }
    private static
    ImmutableList<Reindeer> toList(Twin<Reindeer> twin)
    {
        return Lists.immutable.with(twin.getOne(), twin.getTwo());
    }
    public Twin<Reindeer> and(Reindeer other)
    {
        return Tuples.twin(this, other);
    }
    public int nameLength()
    {
        return this.name().length();
    }
    public Character firstLetterOfName()
    {
        return Character.valueOf(this.name().charAt(0));
    }
}
First, I create an ImmutableList of Reindeer with Rudolph at the front in the method named all. I create an ImmutableList of pairs of all of the other reindeer, based on their usual order in the popular song. I use the type Twin, which is a Pair that has the same type for both items. Finally, I used the method flatCollect to flatten all of the pairs of Reindeer into a single list which is appended to the ImmutableList with Rudolph using the newWithAll method.
Now I will implement some tests for the Reindeer name games.
/**
 * Create a comma separated String of the Reindeer names.
 */
@Test
public void reindeerNameGame1()
{
    String expectedNames = "Rudolph, "+
"Dasher, Dancer, "+
"Prancer, Vixen, "+
"Comet, Cupid, "+
"Donner, Blitzen";
    Assert.assertEquals(
            expectedNames,
            Reindeer.all().makeString(", "));
    Assert.assertEquals(
            expectedNames,
            String.join(", ",
                    Reindeer.all()
                            .asLazy()
                            .collect(Reindeer::name)));
    Assert.assertEquals(
            expectedNames,
            Reindeer.all()
                    .stream()
                    .map(Reindeer::name)
                    .collect(Collectors.joining(", ")));
}
In this test, I show three different ways a comma separated String of the reindeer names can be created. First, I use makeString from Eclipse Collections. The method makeString does not require the object to be a CharSequence. It uses the toString implementation of the Object. Next, I use String.joinwhich was added in Java 8. This method takes an Iterable of CharSequence, which I create using a LazyIterable with collect. Finally, I use a stream with the ImmutableList returned from all and then map each Reindeer to its name, and collect them all into a String using Collectors.joining. All three approaches have the exact same result.
/**
 * Count the Reindeer names based on their size.
 */
@Test
public void reindeerNameGame2()
{
    IntBag nameCounts =
            Reindeer.all().asLazy()
                    .collectInt(Reindeer::nameLength)
                    .toBag();

    IntBag nameCountsFromIntStream =
            IntBags.mutable.withAll(
                    Reindeer.all().stream()
                            .mapToInt(Reindeer::nameLength));

    Map<Integer, Long> streamNameCounts =
            Reindeer.all().stream()
                    .collect(Collectors.groupingBy(
                            Reindeer::nameLength,
                            Collectors.counting()));

    Assert.assertEquals(nameCounts, nameCountsFromIntStream);
    Assert.assertEquals(3, nameCounts.sizeDistinct());
    Assert.assertEquals(3, nameCounts.occurrencesOf(5));
    Assert.assertEquals(3, nameCounts.occurrencesOf(6));
    Assert.assertEquals(3, nameCounts.occurrencesOf(7));

    Assert.assertEquals(new Long(3), streamNameCounts.get(5));
    Assert.assertEquals(new Long(3), streamNameCounts.get(6));
    Assert.assertEquals(new Long(3), streamNameCounts.get(7));
}
In this test, I show three different ways to count the names of the Reindeer by their length. First, I create an IntBag, by collecting all of the name lengths for the Reindeer using collectInt and then converting the result toBag. In the second case, I create an IntStream from the Reindeer by mapping their name lengths to an int using mapToInt. I use the withAll method to create an IntBag from an IntStream. This method became available in Eclipse Collections 9.0 (Look at Item #3 for a comparison to previous versions). Finally, I use Stream with Collectors.groupingBy and Collectors.counting which results in a Map of Integer to Long.
/**
 * Group Reindeer by the first letter of their names.
 */
@Test
public void reindeerNameGame3()
{
    Multimap<Character, Reindeer> multimap =
            Reindeer.all().groupBy(Reindeer::firstLetterOfName);
    Map<Character, List<Reindeer>> mapOfLists =
            Reindeer.all()
                    .stream()
                    .collect(Collectors.groupingBy(
                            Reindeer::firstLetterOfName));
    Assert.assertEquals("Dasher, Dancer, Donner",
            multimap.get('D').makeString(", "));
    Assert.assertEquals("Comet, Cupid",
multimap.get('C').makeString(", ")); Assert.assertEquals(multimap.get('D'), mapOfLists.get('D'));
Assert.assertEquals(multimap.get('C'), mapOfLists.get('C'));
}In this test, I illustrate two ways to group Reindeer by the first letter of their last name. First, I use the groupBy method available directly on ImmutableList, which returns a Multimap. In the second example, I use the stream method on ImmutableList and collect method on Stream with the groupingByCollector on the Collectors utility class.
I hope you enjoyed joining in these reindeer games. I explored a bunch of Eclipse Collections and Streams APIs in these three examples that may be useful in your own Java code.
Have a Happy Holiday and Happy New Year!
Eclipse Collections is open for contributions. If you like the library, you can let us know by starring it on GitHub.
↧
↧
Andrey Loskutov: De-obfuscating Eclipse workers
Imagine you are debugging Eclipse IDE, which does something long and boring, running multiple worker threads, and of course all of them have very clear and consistent names: Worker-1, Worker-2, Worker-3, ..., Worker-101, Worker-102, ..., you got it, I hope.
What do they do, you may ask? They all work, what else:
Now we have Christmas time, and what happens at this time? Santa is coming to all good plug-in developers!
If you use latest 4.8 Eclipse SDK build (from the 4.8 builds download page), and enable "Preferences -> Java -> Debug -> Listen to thread name changes", you can finally see what all those busy workers above really do:
Isn't this cool?
P.S.
For details see bug 223492 and bug 528808.
Right now the preference is not enabled by default, but we hope to enable it in 4.8 M5 after some more testing if there will be no performance related side effects for bigger workspaces.
Enjoy!
What do they do, you may ask? They all work, what else:
 |
| Workers do work, what else we can see here? |
If you use latest 4.8 Eclipse SDK build (from the 4.8 builds download page), and enable "Preferences -> Java -> Debug -> Listen to thread name changes", you can finally see what all those busy workers above really do:
 |
| Workers de-obfuscated |
P.S.
For details see bug 223492 and bug 528808.
Right now the preference is not enabled by default, but we hope to enable it in 4.8 M5 after some more testing if there will be no performance related side effects for bigger workspaces.
Enjoy!
↧
Scott Lewis: Remote Services without OSGi bundles
Remote Services provides a dynamic, transport-independent, simple, modular way to expose micro services. ECF has created a spec-compliant implementation along with a large and growing number of open and extensible distribution providers.
Remote services are frequently useful for fog/edge use cases, where the communication transports (e.g. MQTT) may be different than those typically used in the cloud (e.g. http/https, jaxrs, enterprise messaging, etc).
Typically, remote services are run on OSGi-based frameworks and apps such as Equinox, Felix, Karaf, Eclipse, and others, and indeed ECF's RSA implementation works very well in any of these environments.
Perhaps less well known, however, is that remote services can be used in other inter-process environments...for example between Java and Python.
It's also possible to use ECF remote services without an OSGi framework, i.e. running only as Java applications. This repository has an example of using ECF remote services without an OSGi framework. The projects are Java applications (no OSGi framework assumed), on both the remote service provider side, as well as the remote service consumer side. The examples may be run within Eclipse by using the launch configs in the example projects.
Most of the benefits of OSGi Remote Services are still available...for example the ability to use multiple distribution providers for a service, the ability to remotely discover services and dynamically respond to network failure, and the ability to use the OSGi service registry for service dynamics, and service injection. Also, the service definition, implementation, registration and lookup are exactly the same whether via an OSGi bundle or a Java application. This allows services to be defined consistently across runtime environments in addition to cross-distribution mechanisms.
Please clone the ServiceRegistry github repository and give things a try!
↧
Fabian Steeg: Java annotation processing in Eclipse
Java annotations provide metadata for Java code. Many developers use annotations provided by standard Java APIs (like @Override) or by frameworks (like @Test). Developers can define their own annotations and process them at runtime using reflection. Additionally, Java provides APIs for writing custom annotation processors that can process these annotations at compile time.
Eclipse provides support for hooking these processors into the compilation process. So when you edit code with these annotations, the processor can analyse the source files, do stuff, and report information back to you.
To give you an idea about how that works, I’ll use Contracts for Java as an example, a tool that implements a contract model similar to that of Eiffel in Java, based on annotations. For our setup, we’ll need Eclipse 4.7 (Oxygen, the 2017 release) or later.
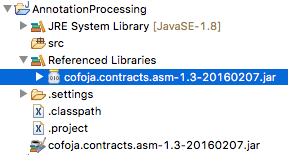
To use Contracts for Java, create a Java project, and add the latest release to the build path:
Then add some code that uses contract annotations (copy and paste the code below into the src folder of your project):
import com.google.java.contract.Ensures;
import com.google.java.contract.Requires;

public class Contracts {
    public static void main(String[] args) {
        System.out.println(new Numbers().add(-10, 5));
    }
}

class Numbers {
    @Requires({ "c > 0", "b > 0" })
    @Ensures({ "result > a", "result > b" })
    int add(int a, int b) {
        return a - b;
    }
}
At this point, the project should not report any issues. Normal compilation of the Java source file works just fine. Our processor is not enabled for our annotations yet. To configure the annotation processing we go to Project > Properties > Java Compiler > Annotation Processing.
Select Enable project specific settings and add the following options that we want to pass to the annotation processor: set com.google.java.contract.classpath to %classpath% and com.google.java.contract.classoutput to %PROJECT.DIR%/.apt_generated (the location of your project’s generated source directory):
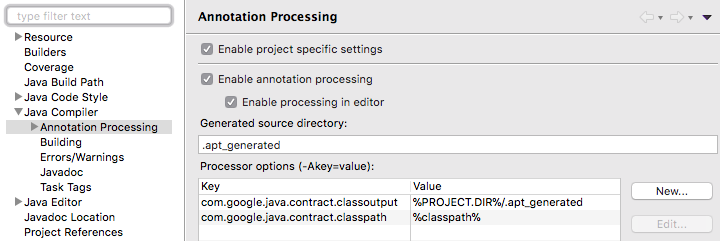
These properties are used by the processor to compile the annotated files, and to create output files. The %classpath% placeholder is replaced with your Java project’s build path by Eclipse, so that the annotation processor can access all the libraries used in your project when compiling your code. The %PROJECT.DIR% placeholder is replaced with the path to your Java project.
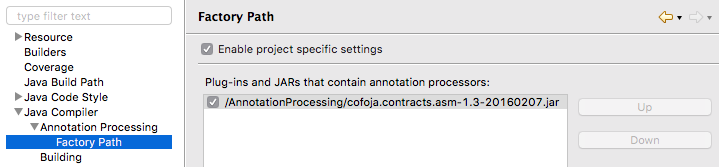
Finally we add the processor Jar to Project > Properties > Java Compiler > Annotation Processing > Factory Path:
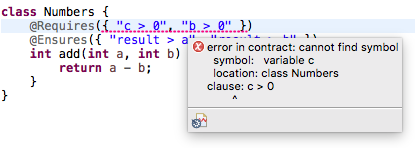
After confirming these changes, and running a full build, compilation issues in the annotations are now reported in the editor. Our code contains a precondition mentioning a variable called c. But the annotated method has no c parameter. This is reported as an error in the editor:
After we fix the first precondition to a > 0, the code compiles, and we can run it (Run > Run as > Java application).
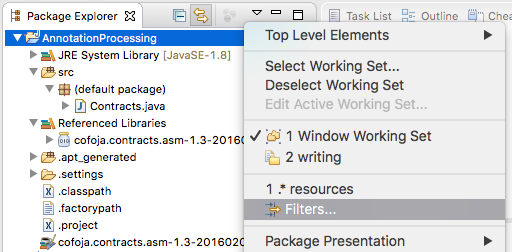
To see the files generated by the processor in the .apt_generated directory in Eclipse, you should disable filtering of .*resources in the Package Explorer’s view menu (the little triangle > Filters…):
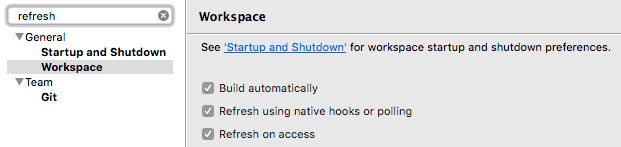
Also make sure you have set up your workspace to refresh automatically in Preferences > General > Workspace > Refresh using native hooks or polling:
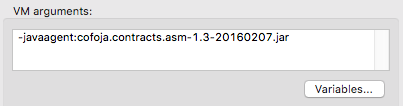
Besides the annotation processing at compile time, Contracts for Java also uses bytecode instrumentation for its runtime checks. To have the contracts checked at runtime, add -javaagent:cofoja.contracts.asm-1.3-20160207.jar to the VM arguments of your run configuration (go to Run > Run Configurations, activate the Arguments tab):
Now, when running, we are made aware of the violated precondition in our code, since we are passing -10 as a, which is not larger than 0:

After we fix the call violating the precondition to new Numbers().add(10, 5); we now see that our implementation of add does not fulfill the postcondition, since the result is not larger than a:

After fixing our implementation to return a + b, not a - b, all contracts are fulfilled and the code now runs without errors.
Contracts for Java uses annotations in an interesting way and shows what can be achieved with annotation processing as a tool, and how Java annotation processors can integrate with Eclipse.
If you’re interested in creating your own processors, check out my test projects for bug 3412981 to get a basic setup where an annotation processor compiles the annotated Java source file.
For more information on these tools check out the Contracts for Java and JDT-APT project sites.
1 That bug came up in the comments of a previous post about using Contracts for Java in Eclipse.
↧
Nikhil Nanivadekar: In Review — 2017
 Sunset on Miyajima (Dusk of 2017)
As the sun is about to set for 2017, I but can’t help reflect what an amazing year 2017 has been! For me personally 2017 was a year of many “firsts”. I have summarized few of the many awesome experiences I had in 2017.
Experiencing the Land of the Rising Sun: In February I visited Japan and was awestruck by the beauty, heritage, friendliness, hospitality, cleanliness and most importantly the delicious food. I do not speak Japanese, and at first I was a bit apprehensive of how the visit will turn out. Few of my Japanese friends taught me some important phrases and I ventured ahead. I am happy to say, it was an experience of the lifetime. The people in Japan were very friendly and accommodating. I tried to converse with them in a mixture of English, Hindi, Marathi, sign-language and most importantly tried hard to learn new bits and pieces of Japanese. One of the humbling experiences was in Hiroshima when I was trying to get to Miyajima. I got on the wrong bus and ended up at a completely different train station. Patiently the bus driver explained the route to me with just numbers and sign-language and I reached the ferry to Miyajima without any further issues. This was my first visit to Japan but definitely not the last one!
Devoxx US: In March I was one of the speakers at Devoxx US. The conference was filled with rich content, amazing speakers and gave numerous opportunities to network, share ideas and concepts. I co-presented Collections.compare and Robots for the Kid in Us talks. I was also one of the conductors for Devoxx4Kids workshop which took place before Devoxx. This was my first Devoxx experience and I enjoyed it a lot. I hope to have the opportunity to present at many more Devoxx-es in the future.
Eclipse Collections Project Lead: In April, I was handed over the reins of Eclipse Collections and made the active project lead. I have been a contributor to the framework for more than 2 years and it was an amazing feeling to be recognized as a project lead. I worked hard to continue the legacy of successful project leads like Hiroshi, Craig and Don. This year we designed the official Eclipse Collections project logo, released 9.0.0 major version which works fine with JDK 9, presented Eclipse Collections via numerous avenues. I have highlighted my experience leading Eclipse Collections in this blog.
GIDS 2017: In April, I traveled to India, my homeland and presented at the Great Indian Developer Summit (GIDS 2017). This was my first time at GIDS and I will highly recommend developers to participate in GIDS as a speaker or as an attendee. The conference organizers do a phenomenal job putting the event together. They take good care of not just the attendees but also the speakers. The 4-day event was sold out with standing room only for pretty much all presentations. Looking forward to continued participation at GIDS.
JavaOne: In September, I was happy to be a part of the speaker lineup for JavaOne and JavaOne4Kids. This was my third JavaOne (second as a speaker) and like every year it was an amazing week. I was delighted to reconnect with many friends, Java Gurus, developer advocates, awesome people from the community. I learnt a lot of new things with the main theme being JDK 9, advancing Eclipse Collections and open source participation. I also planned my UK, Ireland JUG tour during the tail end of JavaOne. JavaOne was definitely one the highlights of my year.
UK, Ireland JUG tour: As the year drew to an end, I visited UK, Ireland in November. I presented at various Java User Groups during my visit. In summer, I had visited Manchester and met one of my good friends Nick. Nick is also one of the organizers of Manchester Java Community (MJC) and floated the idea of me returning to Manchester to present at an MJC event. This was really the beginning of the tour planning. It was an amazing experience to travel to London, Belfast, Dublin, Edinburgh, Manchester, Birmingham and meet with the Java community and have a ton of amazing discussions. I have written my tour experience on this blog. I would definitely want to do a similar tour again.
Wrap it up in India: I decided what other better way to end an awesome year than to visit family and take a break for a couple of weeks. 2017 was definitely a year of many firsts, I hope to continue the streak in 2018 and wish that it is much more positively eventful with many firsts and seconds.
I would like to thank each and every one who was a part of my 2017 and hoping to create even more awesome memories in 2018.
Wishing everyone a Happy, Healthy and Safe New Year!
 Sunrise on Crete (Dawn of 2018)
↧
↧
Lorenzo Bettini: Analyzing Eclipse plug-in projects with Sonarqube
In this tutorial I’m going to show how to analyze multiple Eclipse plug-in projects with Sonarqube. In particular, I’m going to focus on peculiarities that have to be taken care of due to the standard way Sonarqube analyzes sources and to the structure of typical Eclipse plug-in projects (concerning tests and code coverage).
The code of this example is available on Github: https://github.com/LorenzoBettini/tycho-sonarqube-example
This can be seen as a follow-up of my previous post on “Jacoco code coverage and report of multiple Eclipse plug-in projects. I’ll basically reuse almost the same structure of that example and a few things. The part of Jacoco report is not related to Sonarqube but I’ll leave it there.
The structure of the projects is as follows:

Each project’s code is tested in a specific .tests project. The code consists of simple Java classes doing nothing interesting, and tests just call that code.
The project example.tests.parent contains all the common configurations for test projects (and test report, please refer to my previous post on “Jacoco code coverage and report of multiple Eclipse plug-in projects for the details of this report project, which is not strictly required for Sonarqube).
This is its pom
<project xmlns="http://maven.apache.org/POM/4.0.0" xmlns:xsi="http://www.w3.org/2001/XMLSchema-instance"
  xsi:schemaLocation="http://maven.apache.org/POM/4.0.0 http://maven.apache.org/xsd/maven-4.0.0.xsd">
  <modelVersion>4.0.0</modelVersion>
  <parent>
    <groupId>example</groupId>
    <artifactId>example.parent</artifactId>
    <version>0.0.1-SNAPSHOT</version>
  </parent>

  <artifactId>example.tests.parent</artifactId>
  <packaging>pom</packaging>

  <properties>
    <!-- this will be overridden in jacoco profile with tycho.testArgLine,
      which, in turn, will be set by Jacoco prepare-agent goal. This property can
      then be used in argLine for custom tycho-surefire configuration, both when
      Jacoco is used and when it is not used. -->
    <additionalTestArgLine></additionalTestArgLine>
    <jacoco-version>0.7.9</jacoco-version>
  </properties>

  <profiles>
    <profile>
      <id>jacoco</id>
      <activation>
        <activeByDefault>false</activeByDefault>
      </activation>
      <properties>
        <!-- This will be set by Jacoco prepare-agent goal -->
        <additionalTestArgLine>${tycho.testArgLine}</additionalTestArgLine>
      </properties>
      <build>
        <plugins>
          <plugin>
            <groupId>org.jacoco</groupId>
            <artifactId>jacoco-maven-plugin</artifactId>
            <version>${jacoco-version}</version>
            <configuration>
              <excludes>
                <exclude>**/plugin1/Main.class</exclude>
              </excludes>
            </configuration>
            <executions>
              <execution>
                <goals>
                  <goal>prepare-agent</goal>
                </goals>
              </execution>
            </executions>
          </plugin>
        </plugins>
      </build>
    </profile>
  </profiles>

</project>
Note that this also shows a possible way of dealing with custom argLine for tycho-surefire configuration: tycho.testArgLine will be automatically set the jacoco:prepare-agent goal, with the path of jacoco agent (needed for code coverage); the property tycho.testArgLine is automatically used by tycho-surefire. But if you have a custom configuration of tycho-surefire with additional arguments you want to pass in argLine, you must be careful not to overwrite the value set by jacoco. If you simply refer to tycho.testArgLine in the custom tycho-surefire configuration’s argLine, it will work when the jacoco profile is active but it will fail when it is not active since that property will not exist. Don’t try to define it as an empty property by default, since when tycho-surefire runs it will use that empty value, ignoring the one set by jacoco:prepare-agent (argLine’s properties are resolved before jacoco:prepare-agent is executed). Instead, use another level of indirection: refer to a new property, e.g., additionalTestArgLine, which by default is empty. In the jacoco profile, set additionalTestArgLine referring to tycho.testArgLine (in that profile, that property is surely set by jacoco:prepare-agent). Then, in the custom argLine, refer to additionalTestArgLine. An example is shown in the project example.plugin2.tests pom:
<project xmlns="http://maven.apache.org/POM/4.0.0" xmlns:xsi="http://www.w3.org/2001/XMLSchema-instance"
  xsi:schemaLocation="http://maven.apache.org/POM/4.0.0 http://maven.apache.org/xsd/maven-4.0.0.xsd">
  <modelVersion>4.0.0</modelVersion>
  <parent>
    <groupId>example</groupId>
    <artifactId>example.tests.parent</artifactId>
    <version>0.0.1-SNAPSHOT</version>
    <relativePath>../example.tests.parent</relativePath>
  </parent>

  <artifactId>example.plugin2.tests</artifactId>
  <packaging>eclipse-test-plugin</packaging>

  <build>
    <plugins>
      <plugin>
        <groupId>org.eclipse.tycho</groupId>
        <artifactId>tycho-surefire-plugin</artifactId>
        <version>${tycho-version}</version>
        <configuration>
          <!-- additionalTestArgLine is set in the parent project with the
            Jacoco agent when the jacoco profile is active (and it will be empty when
            jacoco profile is not active). This way, you can customize argLine without
            overwriting the jacoco agent set by jacoco:prepare-agent. -->
          <argLine>${additionalTestArgLine} -DbuildingWithTycho=true</argLine>
        </configuration>
      </plugin>
    </plugins>
  </build>
</project>
You can check that code coverage works as expected by running (it’s important to verify that jacoco has been configured correctly in your projects before running Sonarqube analysis: if it’s not working in Sonarqube then it’s something wrong in the configuration for Sonarqube, not in the jacoco configuration, as we’ll see in a minute):
mvn clean verify -Pjacoco
Mare sure that example.tests.report/target/site/jacoco-aggregate/index.html reports some code coverage (in this example, example.plugin1 has some code uncovered by intention).
Now I assume you already have Sonarqube installed.
Let’s run a first Sonarqube analysis with
mvn clean verify -Pjacoco sonar:sonar
This is the result:

So Unit Tests are correctly collected! What about Code Coverage? Something is shown, but if you click on that you see some bad surprises:

Code coverage only on tests (which is irrelevant) and no coverage for our SUT (Software Under Test) classes!
That’s because jacoco .exec files are by default generated in the target folder of the tests project, now when Sonarqube analyzes the projects:
- it finds the jacoco.exec file when it analyzes a tests project but can only see the sources of the tests project (not the ones of the SUT)
- when it analyzes a SUT project it cannot find any jacoco.exec file.
We could fix this by configuring the maven jacoco plugin to generate jacoco.exec in the SUT project, but then the aggregate report configuration should be updated accordingly (while it works out of the box with the defaults). Another way of fixing the problem is to use the Sonarqube maven property sonar.jacoco.reportPaths and “trick” Sonarqube like that (we do that in the parent pom properties section):
<!-- Always refer to the corresponding tests project (if it exists) otherwise
      Sonarqube won't be able to collect code coverage. For example, when analyzing
      project foo it wouldn't find code coverage information if it doesn't use
      foo.tests jacoco.exec. -->
    <sonar.jacoco.reportPaths>
      ../${project.artifactId}.tests/target/jacoco.exec
    </sonar.jacoco.reportPaths>
This way, when it analyzes example.plugin1 it will use the jacoco.exec found in example.plugin1.tests project (if you follow the convention foo and foo.tests this works out of the box, otherwise, you have to list all the jacoco.exec paths in all the projects in that property, separated by comma).
Let’s run the analysis again:

OK, now code coverage is collected on the SUT classes as we wanted. Of course, now test classes appear as uncovered (remember, when it analyzes example.plugin1.tests it now searchs for jacoco.exec in example.plugin1.tests.tests, which does not even exist).
This leads us to another problem: test classes should be excluded from Sonarqube analysis. This works out of the box in standard Maven projects because source folders of SUT and source folders of test classes are separate and in the same project (that’s also why code coverage for pure Maven projects works out of the box in Sonarqube); this is not the case for Eclipse projects, where SUT and tests are in separate projects.
In fact, issues are reported also on test classes:

We can fix both problems by putting in the tests.parent pom properties these two Sonarqube properties (note the link to the Eclipse bug about this behavior)
<!-- Workaround for https://bugs.eclipse.org/bugs/show_bug.cgi?id=397015 -->
    <sonar.sources></sonar.sources>
    <sonar.tests>src</sonar.tests>
This will be inherited by our tests projects and for those projects, Sonarqube will not analyze test classes.
Run the analysis again and see the results: code coverage only on SUT and issues only on SUT (remember that in this example MyClass1 is not uncovered completely by intention):


You might be tempted to use the property sonar.skip set to true for test projects, but you will use JUnit test reports collection.
The final bit of customization is to exclude the Main.java class from code coverage. We have already configured the jacoco maven plugin to do so, but this won’t be picked up by Sonarqube (that configuration only tells jacoco to skip that class when it generates the HTML report).
We have to repeat that exclusion with a Sonarqube maven property, in the parent pom:
<!-- Example of skipping code coverage (comma separated Java files). -->
    <sonar.coverage.exclusions>
      **/plugin1/Main.java
    </sonar.coverage.exclusions>
Note that in the jacoco maven configuration we had excluded a .class file, while here we exclude Java files.
Run the analysis again and Main is not considered in code coverage:

Now you can have fun in fixing Sonarqube issues, which is out of the scope of this tutorial
This example is also analyzed from Travis using Sonarcloud (https://sonarcloud.io/dashboard?id=example%3Aexample.parent).
Hope you enjoyed this tutorial and Happy new year!


↧
Eclipse Riena: Hallo Welt!
Willkommen zur deutschen Version von WordPress. Dies ist der erste Beitrag. Du kannst ihn bearbeiten oder löschen. Und dann starte mit dem Schreiben!
↧
Donald Raab: The 4am Jamestown-Scotland ferry and other optimization strategies
When performance is important, so is understanding your available options.
 Shortcuts sometimes aren’t.
Happy New Year!
I thought I would start out 2018 with a performance optimization story from 2017.
Takeaways from this blog
- Java Iteration Pattern Optimization Strategies
- A few Eclipse Collections and Java Stream Iteration Pattern options.
- Recommendations at the end
A shortcut with a twist
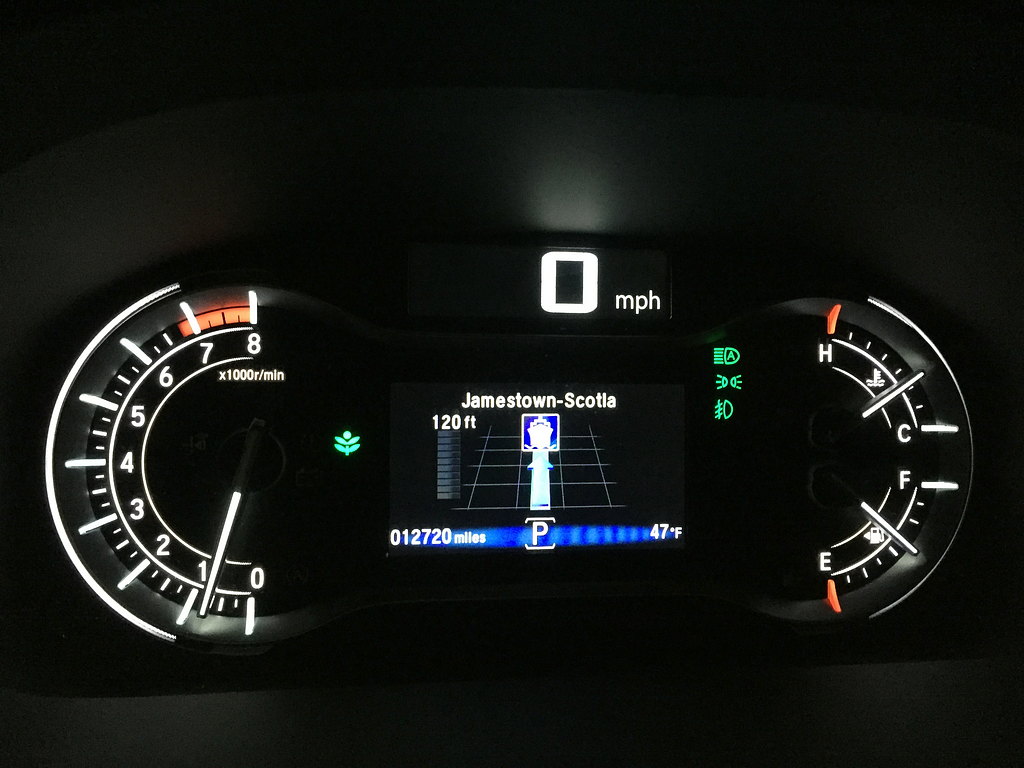
On January 2nd 2017, I sat with my family in our Honda Pilot on a pier at 3:30am for a half hour waiting for the 4am Jamestown-Scotland ferry to arrive. I had come to the literal end of the road on a shortcut that wasn’t exactly as I had expected. I decided to take the shorter distance route on my car’s Nav System to avoid having to go north on Interstate 95 only then to have to go south to get to Williamsburg, Virginia. I’ve gotten stuck in bumper to bumper traffic in Virginia on Route 95 on late night rides coming back from Florida a few times before. When we got to the end of the road on our shorter route, the Nav System indicated the next turn was to get on the ferry (see picture above).
I was willing to take slower local roads, especially since it was early in the morning and there would be no traffic on them. We discovered too late that the path that our chosen path included a ferry ride. At this point, we only had two options. We could wait for the ferry and hope it was running, or turn around and add another 3 to 4 hours to our trip. A classic Hobson’s Choice. We waited for the ferry. It turned out to be a fun experience once we parked our car on the ferry, but I would have preferred an alternative at 4am after driving 14 hours.
“Two roads diverged in a wood…” — Robert Frost
I certainly took the one less traveled by. I did learn a new route that I didn’t know before for getting to Williamsburg from Orlando, as well as the planning required to optimize that route with the ferry schedule.
What does this trip have to do with Eclipse Collections, you may ask? Well, the path I took was the Serial (one lane Colonial era roads), Lazy (ferry does the work until you get to the dock), and Boxed (your car is literally boxed in on the ferry by other cars) — just one of many options you can choose with Eclipse Collections and Java Streams.
“Premature optimization is the root of all evil” — Donald Knuth
Readability should be prioritized above performance when writing code. However, it helps to know what your available performance optimization options are, before you discover last minute your only option is stopping and waiting for the next ferry. You may actually be able to achieve better performance without sacrificing readability. In fact, there may be options you were unaware of previously that improve both readability and performance.
There is a set of Iteration Pattern Optimization Strategies that I believe all developers should become aware of so they can appropriately tune their code for the best performance.
Don’t guess when optimizing code. First prove you have a problem that needs to be fixed. Then benchmark any solutions you think may help to prove that they actually do.
Travelers Beware: You can lose many hours of your life measuring performance optimization benefits. The tests I have run below take 45–50 minutes to run each time. I had to run them several times along with unit tests to validate that the results were the same across all similar tests. When you see the charts, you may be at first compelled by the graphs in terms of wanting to change your code to be more “optimal”. Optimal may not equate to noticeably faster in terms of your application’s overall performance. Each of these tests take at most hundreds of milliseconds to run. They are all “fast”, because they are all in memory. The optimal solutions may only accumulate savings over a large number of executions. If you happen to see a more readable solution you were not aware of here, go for that one.
Iteration Pattern Optimization Strategies
Do you know how to leverage all of these strategies separately and together to increase performance without sacrificing readability?
- Eager — executes immediately with potential optimizations specific to each algorithm and data structure. Eager algorithms are as close to a hand coded for-loop as you will get, so they are easy to understand and debug. I prefer eager as the default option for iterating over collections. It is the simplest and usually most succinct and readable solution available. I consider every other solution a potential optimization, which may prove pre-mature.
- Primitive — If you can avoid boxing primitives, you can reduce memory cost and potentially increase performance. I always use primitive collections and algorithms when I can.
- Lazy — executes only when a terminal operation is called. Optimizations include reducing the amount of memory required and total computation when multiple operation are executed. Short-circuiting effects can really help performance when run lazily. I prefer lazy as soon as I am executing multiple operations that would result in temporary collections being created.
- Parallel — It costs more to run in parallel. You need the right data size, algorithm and multiple cores. If you have all of these, you may benefit from running in parallel. Measure it to prove it.
Eager vs. Lazy — Understanding how they work
Let’s take a list of five integers and perform a filter, map, and reduce set of operations both eagerly and lazily.
@Test
public void eagerVsLazy()
{
    long eagerSum = Lists.mutable.with(1, 2, 3, 4, 5)
            .tap(i -> System.out.println("eager select: "+ i))
            .select(i -> i % 2 == 0)
            .tap(i -> System.out.println("eager collect: "+ i))
            .collectInt(i -> i * 2)
            .tap(i -> System.out.println("eager sum: "+ i))
            .sum();
    System.out.println(eagerSum);

    long lazySum = Lists.mutable.with(1, 2, 3, 4, 5)
            .asLazy()
            .tap(i -> System.out.println("lazy select: "+ i))
            .select(i -> i % 2 == 0)
            .tap(i -> System.out.println("lazy collect: "+ i))
            .collectInt(i -> i * 2)
            .tap(i -> System.out.println("lazy sum: "+ i))
            .sum();
    System.out.println(lazySum);

    Assert.assertEquals(eagerSum, lazySum);
}
Except for the additional call to asLazy in the lazy example, the code should look identical. The printed results are as follows:
eager select: 1
eager select: 2
eager select: 3
eager select: 4
eager select: 5
eager collect: 2
eager collect: 4
eager sum: 4
eager sum: 8
12
lazy select: 1
lazy select: 2
lazy collect: 2
lazy sum: 4
lazy select: 3
lazy select: 4
lazy collect: 4
lazy sum: 8
lazy select: 5
12
Notice how the order of execution changes on the lambdas in the lazy case. In the eager case, two additional lists are created as intermediate results during the execution. A List of Integer with two Integers (2, 4) and then an IntList with two ints (4, 8) are created before the final call to sum. In the lazy case, there are no intermediate collections created. This results in less garbage being generated. This is why I prefer lazy execution when there are multiple operations involved. If there was a single operation involved, then I would default to using the eager solution.
If we look at the serial Stream solution, it’s execution order will be the same as the lazy Eclipse Collections solution.
@Test
public void stream()
{
    int streamSum = Lists.mutable.with(1, 2, 3, 4, 5)
            .stream()
            .peek(i -> System.out.println("stream filter: "+ i))
            .filter(i -> i % 2 == 0)
            .peek(i -> System.out.println("stream map: "+ i))
            .mapToInt(i -> i * 2)
            .peek(i -> System.out.println("stream sum: "+ i))
            .sum();
    System.out.println(streamSum);
}
Here is the output:
stream filter: 1
stream filter: 2
stream map: 2
stream sum: 4
stream filter: 3
stream filter: 4
stream map: 4
stream sum: 8
stream filter: 5
12
Lazy + Parallel = Harder to Follow
Using Eclipse Collections lazy parallel with a batch size of one so we can see the results for a very small list.
@Test
public void parallel()
{
    long parallelSum = Lists.mutable.with(1, 2, 3, 4, 5)
            .asParallel(Executors.newWorkStealingPool(), 1)
            .select(i -> {
                System.out.println("parallel select: "+ i);
                return i % 2 == 0;
            })
            .collect(i -> {
                System.out.println("parallel collect: "+ i);
                return i * 2;
            })
            .sumOfInt(i -> {
                System.out.println("parallel sum: "+ i);
                return i;
            });
    System.out.println(parallelSum);
}
Run 1:
parallel select: 2
parallel select: 1
parallel select: 4
parallel collect: 4
parallel select: 3
sum: 8
parallel select: 5
parallel collect: 2
sum: 4
12
Run 2:
parallel select: 1
parallel select: 3
parallel select: 2
parallel select: 5
parallel select: 4
parallel collect: 2
parallel collect: 4
parallel sum: 4
parallel sum: 8
12
Run 3:
parallel select: 4
parallel select: 2
parallel collect: 2
parallel select: 5
parallel select: 3
parallel select: 1
parallel sum: 4
parallel collect: 4
parallel sum: 8
12
The result is consistent between runs, but the order of execution of lambdas is not guaranteed nor consistent.
Using parallel Streams:
@Test
public void parallelStream()
{
    int streamSum = Interval.oneTo(5).toList()
            .parallelStream()
            .peek(i -> System.out.println("stream filter: "+ i))
            .filter(i -> i % 2 == 0)
            .peek(i -> System.out.println("stream map: "+ i))
            .mapToInt(i -> i * 2)
            .peek(i -> System.out.println("stream sum: "+ i))
            .sum();
    System.out.println(streamSum);
}
Run 1:
stream filter: 4
stream filter: 1
stream map: 4
stream filter: 2
stream sum: 8
stream filter: 3
stream filter: 5
stream map: 2
stream sum: 4
12
Run 2:
stream filter: 5
stream filter: 1
stream filter: 3
stream filter: 2
stream filter: 4
stream map: 2
stream map: 4
stream sum: 4
stream sum: 8
12
Run 3:
stream filter: 2
stream filter: 4
stream map: 2
stream map: 4
stream sum: 8
stream filter: 1
stream filter: 3
stream filter: 5
stream sum: 4
12
Measure, Execute and Repeat.
I am going to show different options and their performance characteristics for a set of use cases using a million randomly generated integers stored in Lists. These are not likely to be the use cases you will encounter in production code, but they should hopefully illustrate some options you may not have been aware of next time you find a bottleneck you were not expecting in your basic Java data structures and algorithms. I will demonstrate the performance differences between using object and primitive lists, eager and lazy APIs, with both serial and parallel execution, with four different use cases.
In each use case, I share what I observed — expected and unexpected. I only observed. I have not dug into the why the results were what they were. “The why” perhaps is a topic for another blog.
Use Cases — Filter, Map, Reduce, and Filter/Map/Reduce
1. Filter even integers into a List
2. Multiply the integers by 2 and storing the result in a List
3. Sum all the integers into a long
4. Filter/Map/Reduce (Filter Evens, Multiply x 2, Sum into long)
The Data — 1,000,000 Integers
private List<Integer> jdkList;
private MutableList<Integer> ecList;
private IntList ecPrimitiveList;
private ExecutorService executorService;
@Setup
public void setup()
{
    PrimitiveIterator.OfInt intGenerator =
        new Random(1L).ints(-1000, 1000).iterator();
    this.ecList =
        FastList.newWithNValues(1_000_000, intGenerator::nextInt);
    this.jdkList = new ArrayList<>(1_000_000);
    this.jdkList.addAll(this.ecList);
    this.ecPrimitiveList =
        this.ecList.collectInt(i -> i, new IntArrayList(1_000_000));
    this.executorService = Executors.newWorkStealingPool();
}
Hardware
I will be using a MacPro with the following hardware specs to measure the benchmarks:
Processor Name: 12-Core Intel Xeon E5
Processor Speed: 2.7 GHz
Number of Processors: 1
Total Number of Cores: 12
L2 Cache (per Core): 256 KB
L3 Cache: 30 MB
Memory: 64 GB
Software
To illustrate the different options that are available for these particular use cases, I will be using JDK 1.8.0_152 with Eclipse Collections and Streams.
Benchmarking
I am using JMH version 1.19 as the benchmark harness for my tests. I am running 30 warmup iterations, and 20 measurement iterations with 2 forks. I am using Mode.Throughput with the tests so they are easy to read. The numbers are in Operations per Second. The bigger the number, the better the result.
public static void main(String[] args) throws RunnerException
{
    Options options = new OptionsBuilder()
        .include(".*"+ IntListJMHTest.class.getSimpleName() + ".*")
            .forks(2)
            .mode(Mode.Throughput)
            .timeUnit(TimeUnit.SECONDS)
            .warmupIterations(30)
            .build();
    new Runner(options).run();
}
I will highlight in dark green the best overall result in the run. I will highlight in light green the best serial execution result. Where I use EC in a label in the chart it stands for a solution using Eclipse Collections. Where I used JDK, the solution uses a standard JDK approach.
Filter even integers
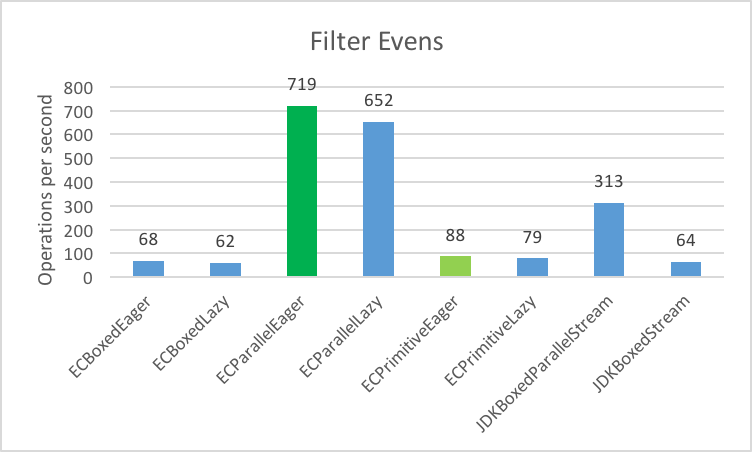 Filter even numbers from a List of 1,000,000 Integers
Expected:
- I expected ECParallelEager to perform better.
- I expected primitive collections to outperform boxed collections.
- I expected serial eager to outperform serial lazy.
Unexpected:
- I did not expect parallel streams to perform this poorly.
@Benchmark
public MutableList<Integer> filterECBoxedEager()
{
    return this.ecList.select(i -> i % 2 == 0);
}
@Benchmark
public MutableList<Integer> filterECBoxedLazy()
{
    return this.ecList
            .asLazy()
            .select(i -> i % 2 == 0)
            .toList();
}
@Benchmark
public MutableList<Integer> filterECParallelEager()
{
    return ParallelIterate.select(
            this.ecList,
            i -> i % 2 == 0,
            new CompositeFastList<>(),
            false);
}
@Benchmark
public MutableList<Integer> filterECParallelLazy()
{
    return this.ecList
            .asParallel(this.executorService, 50_000)
            .select(i -> i % 2 == 0)
            .toList();
}
@Benchmark
public IntList filterECPrimitiveEager()
{
    return this.ecPrimitiveList.select(i -> i % 2 == 0);
}
@Benchmark
public IntList filterECPrimitiveLazy()
{
    return this.ecPrimitiveList
            .asLazy()
            .select(i -> i % 2 == 0)
            .toList();
}
@Benchmark
public List<Integer> filterJDKBoxedParallelStream()
{
    return this.jdkList
            .parallelStream()
            .filter(i -> i % 2 == 0)
            .collect(Collectors.toList());
}
@Benchmark
public List<Integer> filterJDKBoxedStream()
{
    return this.jdkList
            .stream()
            .filter(i -> i % 2 == 0)
            .collect(Collectors.toList());
}
Map each integer x 2
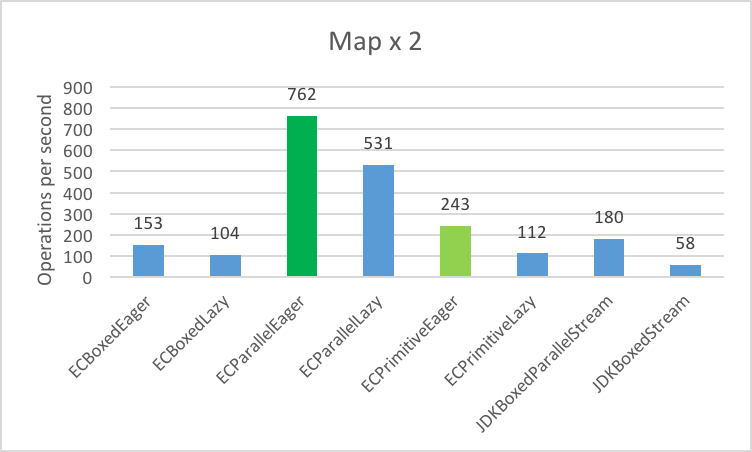 Multiply times two, each integer in a List of 1,000,000 Integers
Expected:
- I expected primitive collections to outperform boxed collections.
- I expected serial eager to outperform serial lazy.
Unexpected:
- I did not expected ECParallelLazy to perform so poorly.
- I did not expect either Stream solutions to perform so poorly.
@Benchmark
public MutableList<Integer> mapECBoxedEager()
{
    return this.ecList.collect(i -> i * 2);
}
@Benchmark
public MutableList<Integer> mapECBoxedLazy()
{
    return this.ecList
            .asLazy()
            .collect(i -> i * 2)
            .toList();
}
@Benchmark
public MutableList<Integer> mapECParallelEager()
{
    return ParallelIterate.collect(
            this.ecList, i -> i * 2,
            new CompositeFastList<>(),
            false);
}
@Benchmark
public MutableList<Integer> mapECParallelLazy()
{
    return this.ecList
            .asParallel(this.executorService, 50_000)
            .collect(i -> i * 2)
            .toList();
}
@Benchmark
public IntList mapECPrimitiveEager()
{
    return this.ecPrimitiveList
            .collectInt(i -> i * 2, IntLists.mutable.empty());
}
@Benchmark
public IntList mapECPrimitiveLazy()
{
    return this.ecPrimitiveList
            .asLazy()
            .collectInt(i -> i * 2)
            .toList();
}
@Benchmark
public List<Integer> mapJDKBoxedParallelStream()
{
    return this.jdkList
            .parallelStream()
            .mapToInt(i -> i * 2)
            .boxed()
            .collect(Collectors.toList());
}
@Benchmark
public List<Integer> mapJDKBoxedStream()
{
    return this.jdkList
            .stream()
            .mapToInt(i -> i * 2)
            .boxed()
            .collect(Collectors.toList());
}
Sum all integers
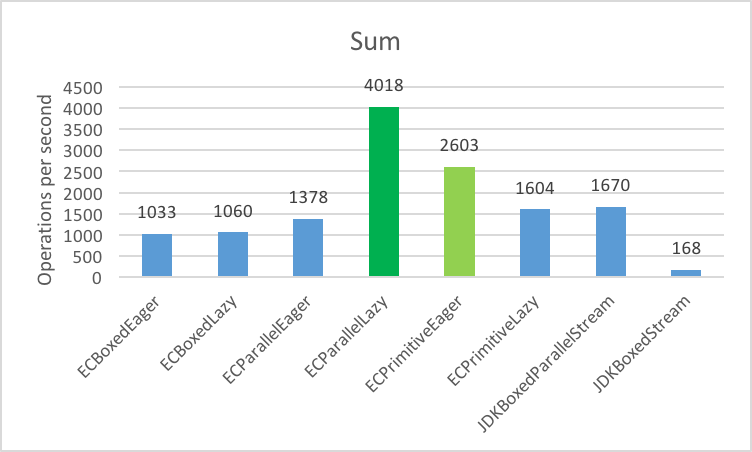 Sum 1,000,000 Integers
Expected:
- I expected primitive collections to outperform boxed collections.
- I expected little benefit from parallelization here. Summing ints is a very fast operation. I expected eager primitive to be faster than most of the parallel options.
Unexpected:
- I did not expect serial streams to get crushed. There seems to have been an improvement made in Java 9. I ran the benchmarks again with Java 9 and this particular benchmark improved by ~7–8x.
@Benchmark
public long sumECBoxedEager()
{
    return this.ecList.sumOfInt(Integer::intValue);
}
@Benchmark
public long sumECBoxedLazy()
{
    return this.ecList
            .asLazy()
            .sumOfInt(Integer::intValue);
}
@Benchmark
public long sumECParallelEager()
{
    return ParallelIterate.sumByInt(
            this.ecList,
            i -> Integer.valueOf(0),
            Integer::intValue).get(0);
}
@Benchmark
public long sumECParallelLazy()
{
    return this.ecList
            .asParallel(this.executorService, 50_000)
            .sumOfInt(Integer::intValue);
}
@Benchmark
public long sumECPrimitiveEager()
{
    return this.ecPrimitiveList.sum();
}
@Benchmark
public long sumECPrimitiveLazy()
{
    return this.ecPrimitiveList
            .asLazy()
            .sum();
}
@Benchmark
public long sumJDKBoxedParallelStream()
{
    return this.jdkList
            .parallelStream()
            .mapToLong(Integer::longValue)
            .sum();
}
@Benchmark
public long sumJDKBoxedStream()
{
    return this.jdkList
            .stream()
            .mapToLong(Integer::longValue)
            .sum();
}
Filter, Map, Sum
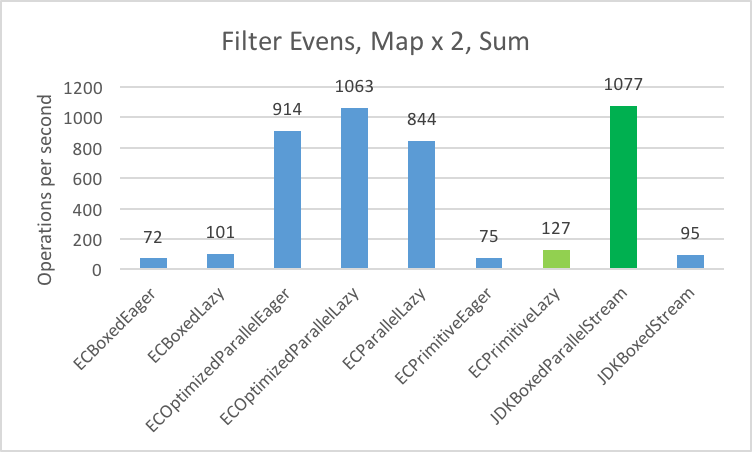 Filter even integers, multiply remaining x 2 and return their sum
Expected:
- I expected lazy operations to outperform eager.
- I expected primitive lazy would outperform all of the other serial operations.
- I expected JDKBoxedParallelStream would perform well with this use case.
Unexpected:
- I did not expect ECParallelEager to do as well as or better than ECParallelLazy, even though it was optimized.
- I did not expect JDKBoxedParallelStream to do better than ECParallelLazy.
@Benchmark
public long filterMapSumECBoxedEager()
{
    return this.ecList
            .select(i -> i % 2 == 0)
            .sumOfInt(i -> i * 2);
}
@Benchmark
public long filterMapSumECBoxedLazy()
{
    return this.ecList
            .asLazy()
            .select(i -> i % 2 == 0)
            .sumOfInt(i -> i * 2);
}
@Benchmark
public long filterMapSumECOptimizedParallelEager()
{
    return ParallelIterate.sumByInt(
            this.ecList,
            i -> i % 2,
            i -> i * 2).get(0);
}
@Benchmark
public long filterMapSumECOptimizedParallelLazy()
{
    return this.ecList
            .asParallel(this.executorService, 50_000)
            .sumOfInt(i -> i % 2 == 0 ? i * 2 : 0);
}
@Benchmark
public long filterMapSumECParallelLazy()
{
    return this.ecList
            .asParallel(this.executorService, 50_000)
            .select(i -> i % 2 == 0)
            .sumOfInt(i -> i * 2);
}
@Benchmark
public long filterMapSumECPrimitiveEager()
{
    return this.ecPrimitiveList
            .select(i -> i % 2 == 0)
            .collectInt(i -> i * 2, IntLists.mutable.empty())
            .sum();
}
@Benchmark
public long filterMapSumECPrimitiveLazy()
{
    return this.ecPrimitiveList
            .asLazy()
            .select(i -> i % 2 == 0)
            .collectInt(i -> i * 2)
            .sum();
}
@Benchmark
public long filterMapSumJDKBoxedParallelStream()
{
    return this.jdkList
            .parallelStream()
            .filter(i -> i % 2 == 0)
            .mapToLong(i -> (long) (i * 2))
            .sum();
}
@Benchmark
public long filterMapSumJDKBoxedStream()
{
    return this.jdkList
            .stream()
            .filter(i -> i % 2 == 0)
            .mapToLong(i -> (long) (i * 2))
            .sum();
}
Congratulations!
I hope you enjoyed the blog and learned some new things about Iteration Pattern Options and Optimization Strategies using Eclipse Collections and Java Streams. If your only tool is a hammer, everything else is a nail. Knowing your available options before you get started on your journey and adapting as needs arise is one of the keys to writing better and more responsive applications. This can also help you execute a less stressful trip from Orlando to Williamsburg, if ever that occasion happens to arise.
Recommendations
- Prefer Primitives over Boxing.
- Prefer Eager iteration for single or fused operations.
- Prefer Lazy iteration for multi-step operations.
- Prove it before going Parallel.
- Try Eclipse Collections if you want more than Hobson’s Choice.
Eclipse Collections is open for contributions. If you like the library, you can let us know by starring it on GitHub.
↧